Salesforce
Sync data between Salesforce & Regal
This guide describes how to sync your Salesforce Leads, Contacts, Accounts, or Person Accounts with contact profiles in the Regal app. The integration also supports bringing events related to other Salesforce objects, such as Opportunities, Events, and Cases into Regal.
Sandbox Testing Recommended
Due to the highly varied nature of each organization's Salesforce setup, we recommend first testing out the integration within a sandbox Salesforce org in order to reveal any compatibility issues with custom code, flows, or third party software. Be sure to test the workflows and volume that might be typical of your production org.
Additionally, we recommend enabling the various features in the configuration incrementally. For example, you might start with just attempting to sync your Contacts in both directions, then syncing Opportunities, and finally enabling the creation of Task objects.
Install the Regal Voice Salesforce app & assign Permissions
Step 1: Download Regal for Salesforce from the AppExchange here, or get a direct install link from our Release Notes to install the latest Regal managed package for Salesforce.
Step 2: Login to your Salesforce org, then select Install for Admins Only, and check the box acknowledging you are installing a 3rd Party App, and click Install.

Agree to Install 3rd Party App
Step 3: Installation may take up to 10 minutes. Once installed, click Done.
Step 4: Assign permission sets to the Users who will use the app. There are three permission sets to assign:
- Add the “Regal Voice User” permission set to all users that will be making record updates in your org so that those changes will synced over to Regal.
- Add “Regal Voice Integration Manager” permission set to any users that will be managing the Regal configurations, attribute mappings, etc.
- Add “Regal Voice Integration Admin” permission set to the user that will be authenticating the connection from Regal to Salesforce via OAuth (which will be further covered in a later section).
Step 5 (Optional): Add support for Guest Users. This step might be necessary if you have any other integrations that might be updating your Salesforce records using unauthenticated Users.
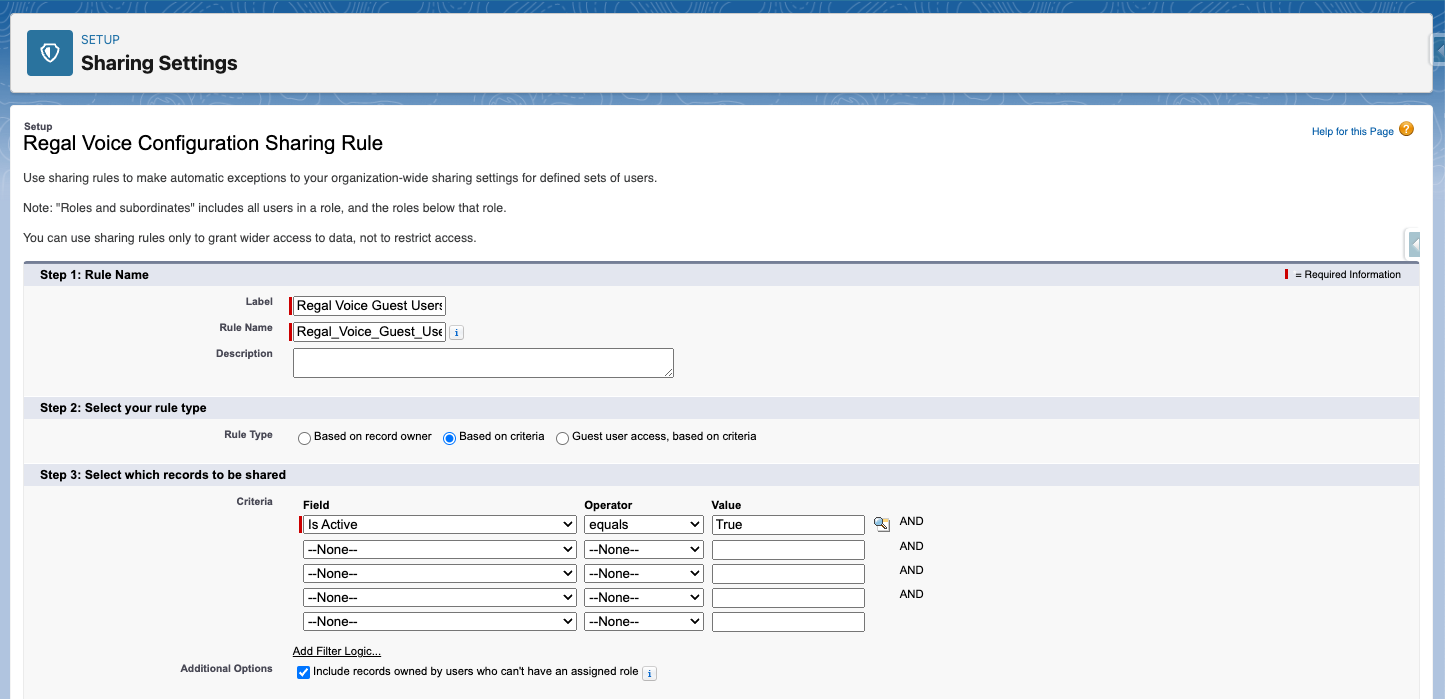
- Go to Setup > Sharing Settings > Regal Voice Configuration Sharing Rules > New. Fill out the new rule as follows:
- Step 1: Set Label = "Regal Voice Guest Users Rule"
- Step 2: select “Based on criteria”
- Step 3: Set Field = "Is Active", Operator = "equals, Value = "True"
- Step 4: select "Guest User" in the dropdown. If you don't see this option, then you likely don't have Guest Users and don't need to complete this Optional step.
- Step 5: select "Read-only"
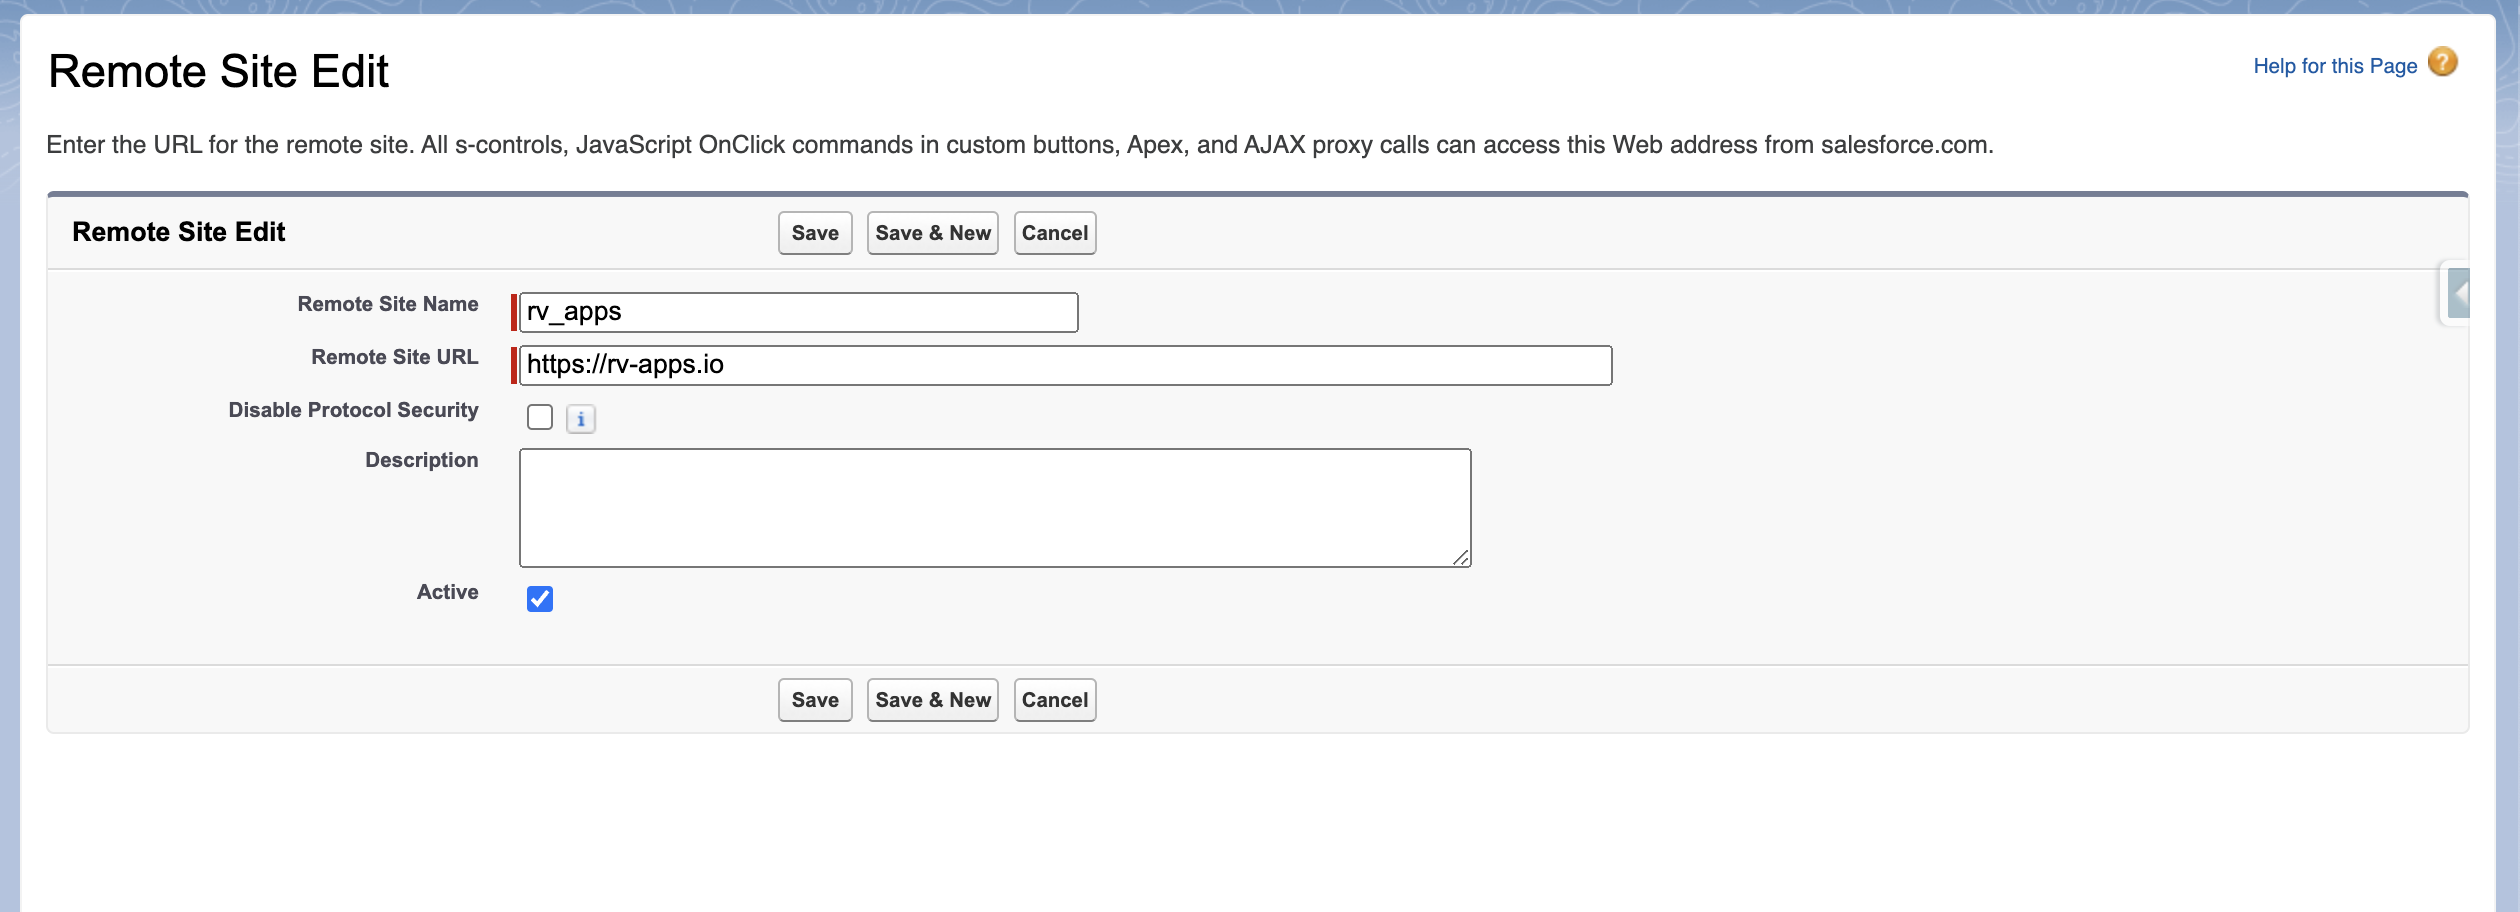
Step 6: Create Remote Site Settings
- Go to Setup > Remote Site Settings > New
- In "Remote Site Name", enter rv_apps
- In "Remote Site URL", enter https://rv-apps.io/salesforce
- Save
Configure Data Flow from Salesforce to Regal
Step 1: Authenticate to Regal
- Find to the Regal app in Salesforce (search for "Regal" in the App Launcher in the top left)
- Go to the Regal Admin Console tab.
- Leave the Endpoint unchanged (the default value should point to https://apps.regal.io/salesforce
- Add your Regal API Key
Step 2: Create a new "Regal Voice Configuration" object
This object stores data for user authorization and for more precise synchronization of events from Salesforce to Regal.
- Click into the apps menu, and search for Regal.
- Click the Regal Voice Configurations tab, then click New.
- Fill out the form according to your needs and click Save.
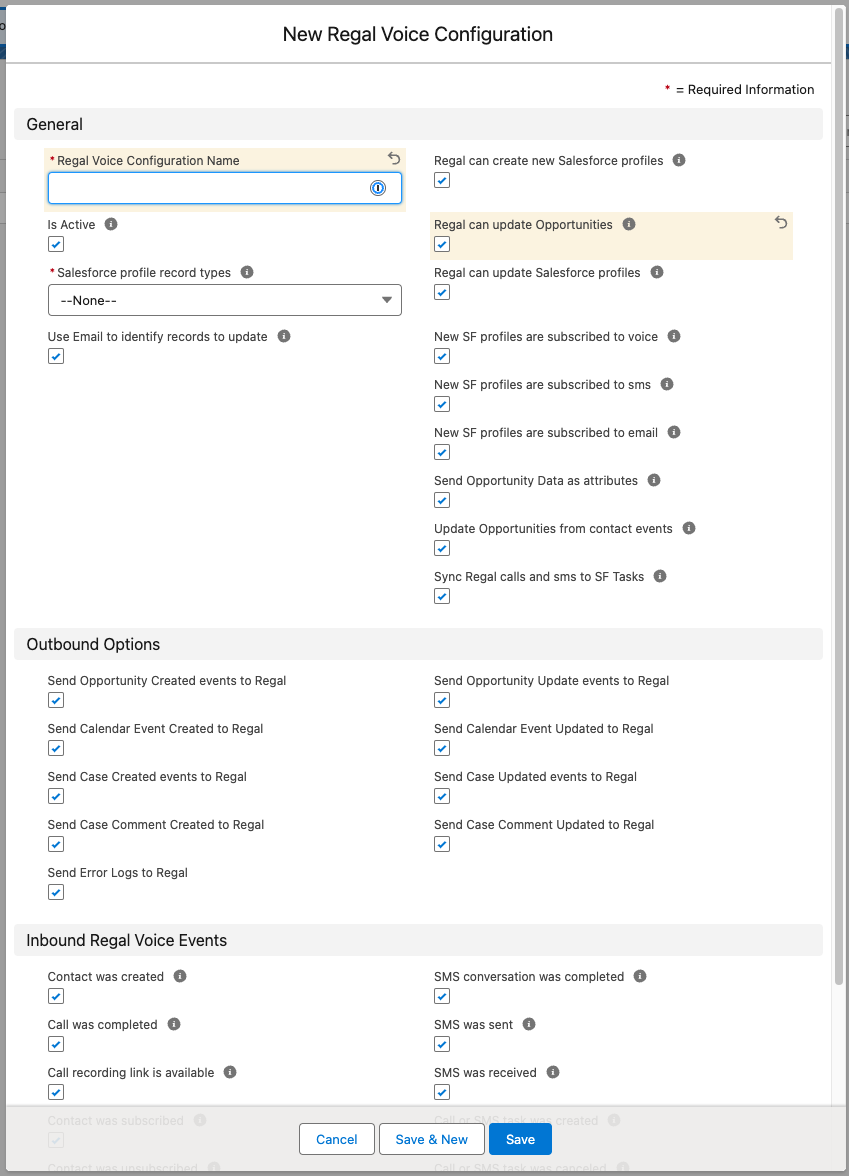
Option descriptions:
- Regal Voice Configuration Name - name it something descriptive like "Full Sync Configuration". You may have multiple of these, e.g. one for testing, one for production.
- Is Active - check to set this configuration active. You should only have one configuration active at a time.
- Salesforce profile record types - choose from among Leads only, Contacts, Accounts, and Person Accounts based on which standard objects you use to represent your current and potential customers (see Step 2 below).
- Use Email to identify records to update - check this box to use traits.email identifiers in events from Regal to locate the relevant Salesforce records. Read more about how the managed package "waterfalls" through available identifiers in Advanced Topics.
- Regal can create new Salesforce profiles - check this box if you want new profiles created in Regal that are not already in Salesforce to create a new corresponding record in Salesforce
- Regal can update Salesforce profiles - check this box if you want updates to profile attributes in Regal to update the equivalent fields in your Salesforce objects
- Regal can update Opportunities - check this box if you want updates to Opportunity attributes in Regal to update the equivalent fields in your Salesforce Opportunities
- New SF profiles are subscribed to {{channel}} - depending on this field, new contacts created in Salesforce will trigger the creation of new contacts in Regal with TRUE or FALSE parameters for subscribing to voice, sms, email channels. Read more about managing Opt-In in Advanced Topics.
- Send Opportunity data as attributes - check this box to have Opportunity data represented as attributes on the contact profile in Regal. Read more about this and the following option in Advanced Topics.
- Update Opportunities from contact events - check this box to allow any changes made to Opportunity data in the Regal contact profile to also update the corresponding Opportunity record in Salesforce
Outbound Options: When secondary objects (Opportunities, Cases, Calendar Events), are created or updated, the integration can send a corresponding event to Regal. To send these events as expected, check the boxes in this section. Unchecking these boxes will mean that no data will be synced to Regal for these objects. We recommend keeping them checked, but a common reason to uncheck them is if your Salesforce org is making numerous updates to those objects and you run the risk of hitting your daily API limit. HIGHLY RECOMMENDED to keep the "Send Error Logs to Regal" option enabled, which controls the sending of a nightly email to our team so that we can proactively address any errors.
Inbound Regal Voice Events: As part of the integration, the Regal app publishes the following events back to Salesforce so that they appear on a Lead, Contact, Account, or Person Account's profile in Salesforce. The “Regal Voice Configuration” object allows you to choose which of these events you'd like to save and display.
Events include:
- Call completed
- Call recording link available
- Contact subscribed
- Contact unsubscribed
- Contact's attributes were edited
- Contact was assigned to an experiment
- SMS conversation completed
- SMS message sent
- SMS message received
- MMS message sent
- MMS message received
- Call or SMS task was created
- Call or SMS task was canceled
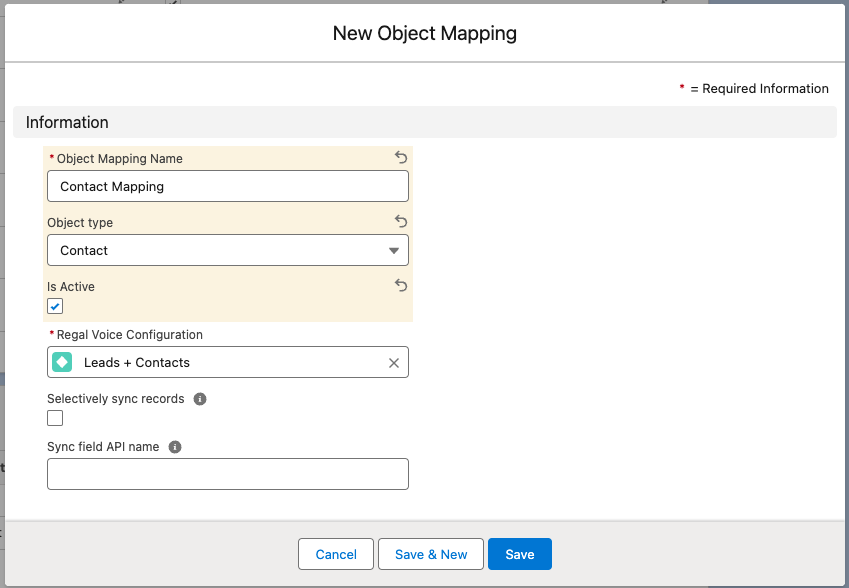
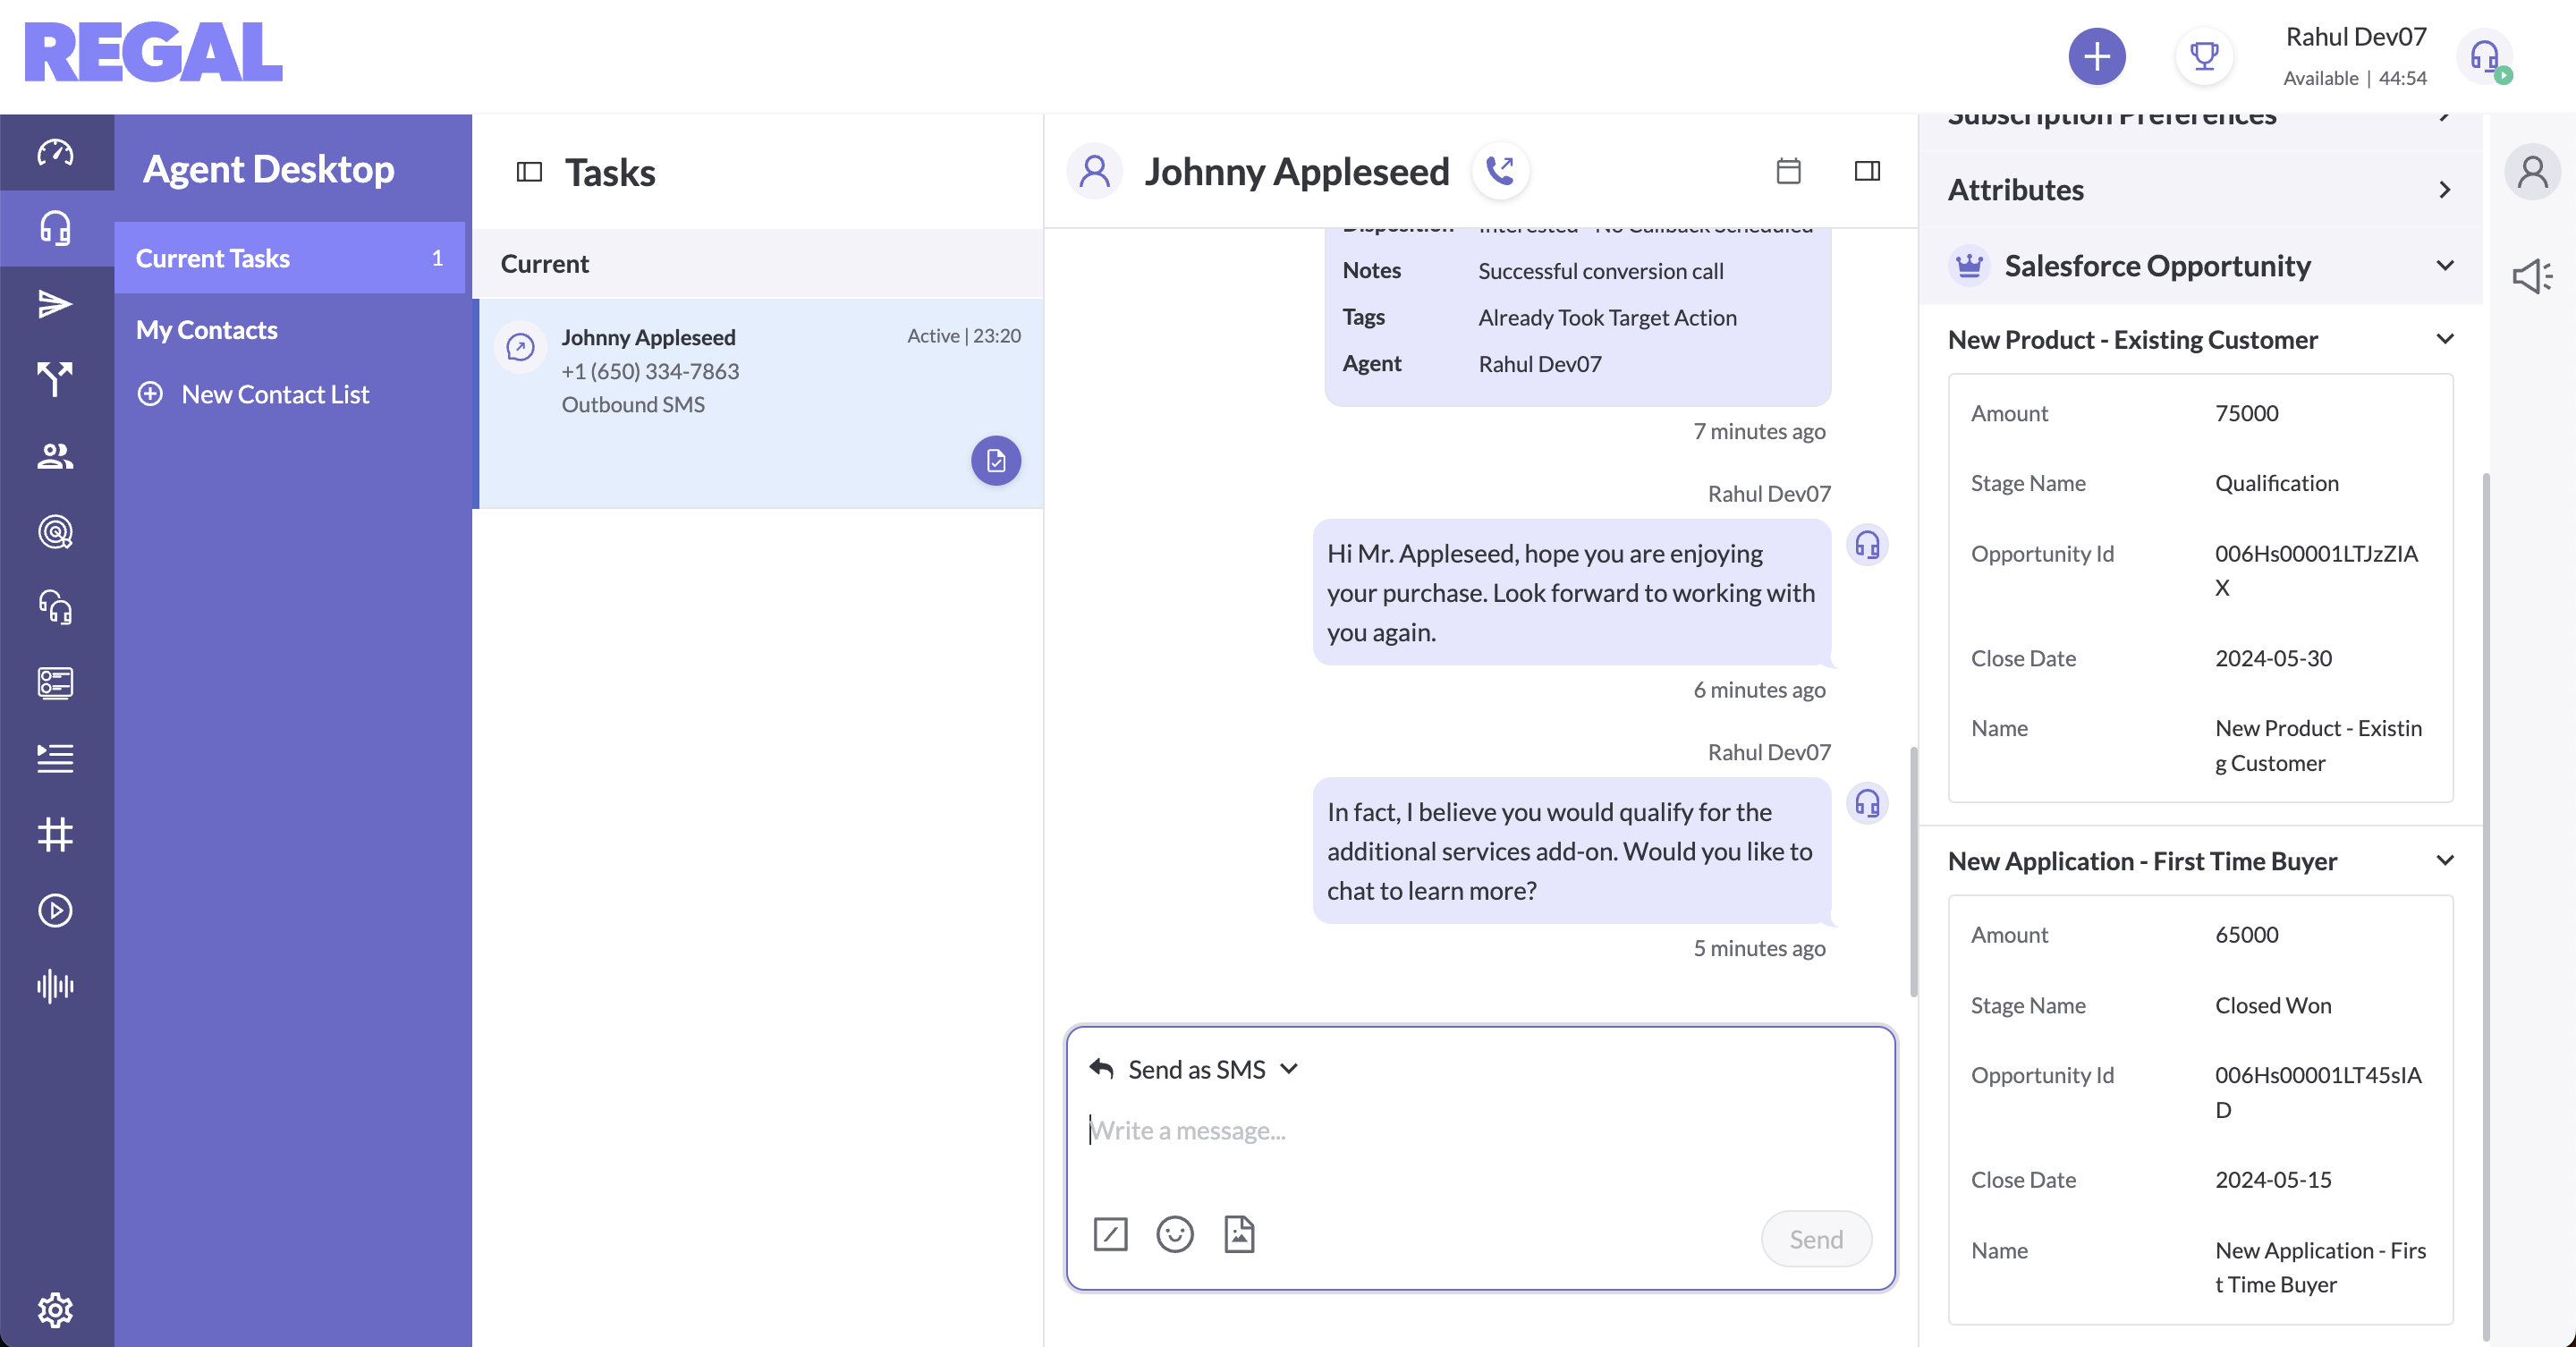
Step 3: Create new "Object Mapping" objects
Using this object, you can specify which objects in Salesforce will be synced with Regal. The integration supports Leads, Contacts, Accounts, Person Accounts and Opportunities.
- Within your Regal Voice Configuration object, go to Object Mappings and click New
- Add entries according to the table below
| Your business process is: | Object field mapping configs you should create: |
|---|---|
| starts as a Lead, does not convert | Lead |
| starts as a Contact | Contact |
| starts as an Account | Account |
| starts as a Person Account | Person Account |
| starts as a Lead, then converts and managed via Contact (Account also created behind the scenes, but not used) | Lead and Contact, not Account |
| starts as a Lead, then converts and managed via Account (Contact also created behind the scenes, but not used) | Lead and Account, not Contact |
| starts as a Lead, then converts to a Person Account | Lead and Person Account |
Do not map more than one of Contact, Account, or Person Account
The objects you create here should correspond with the selection you made in Step 1 above for Desired Objects to Sync.
For example, if you chose the "Contacts (or Leads and Contacts)" option, then you can create mappings for Lead and Contact objects.
Object field descriptions:
- Object Mapping Name - name it something descriptive like "Lead mapping" or "Contact mapping", etc.
- Object type - select Lead, Contact, Account or Person Account
- Is Active - whether synchronization is active or inactive for this object type
- Configuration - select the configuration object defined in Step 2 (should be chosen by default)
- Selectively sync records and Sync field API name - leave disabled for now and see Advanced Topics to learn more.
Object Mapping modal
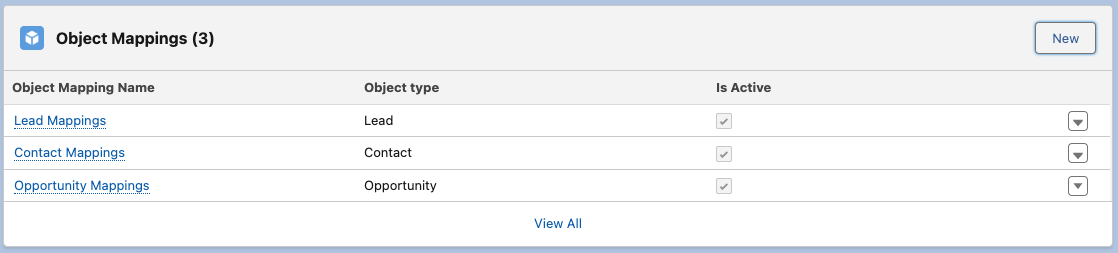
Completed Object Mappings
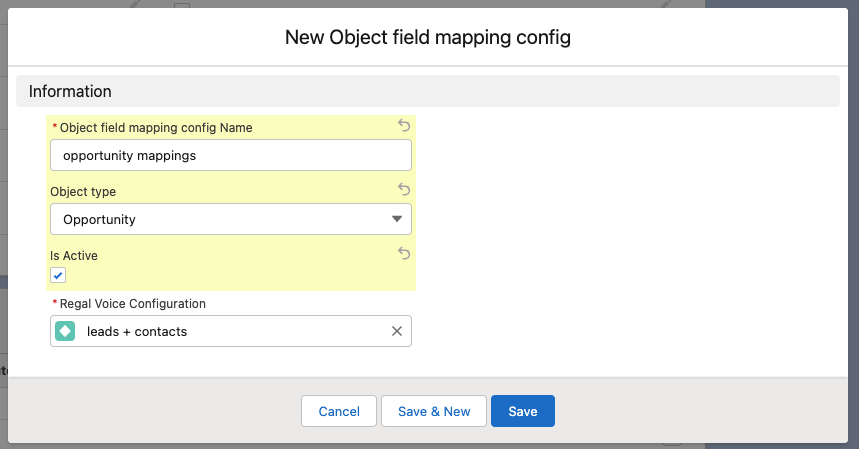
Step 4: Create new "Attribute Mapping" objects
These objects store the mapping relationship between the Salesforce object field names and the corresponding field names in Regal, necessary for correctly syncing in both directions.
- Create a mapping for each field you want to map to Regal.
Object field descriptions:
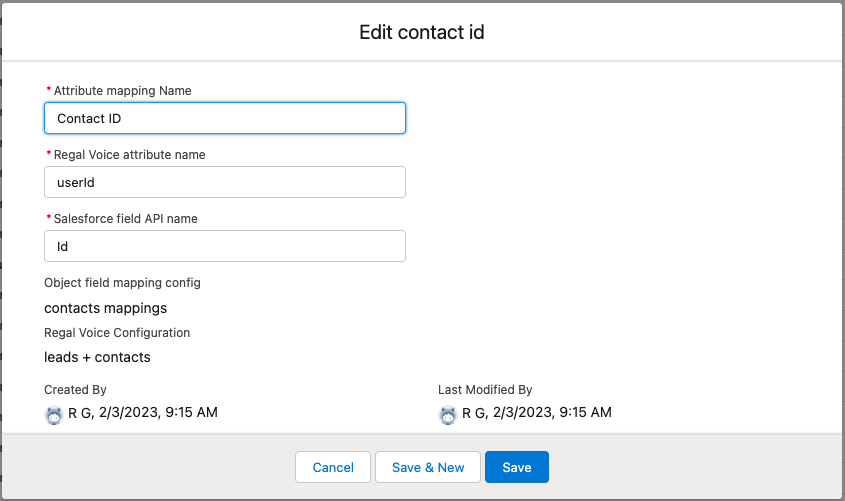
- Attribute mapping name - Name it something descriptive, like "Lead Phone"
- Regal Voice attribute name - See the table below for basic fields to map. The general pattern is that for any contact attributes you want to map from Salesforce to Regal, the “Regal Voice attribute name” must start with “traits.” For example, if you want the Salesforce field "Lead Source" to push through to the Regal Voice profile, the Regal attribute name can be "traits.leadSource." This will then show up on the contact profile in Regal.
- Salesforce field API name - to find the API name of a field, go to Setup > Object Manager > select Object of interest > Fields & Relationships.
- Object field mapping config - select the appropriate Object field mapping config created in the previous step.
- Regal Voice Configuration - select the Configuration this mapping is activated by.
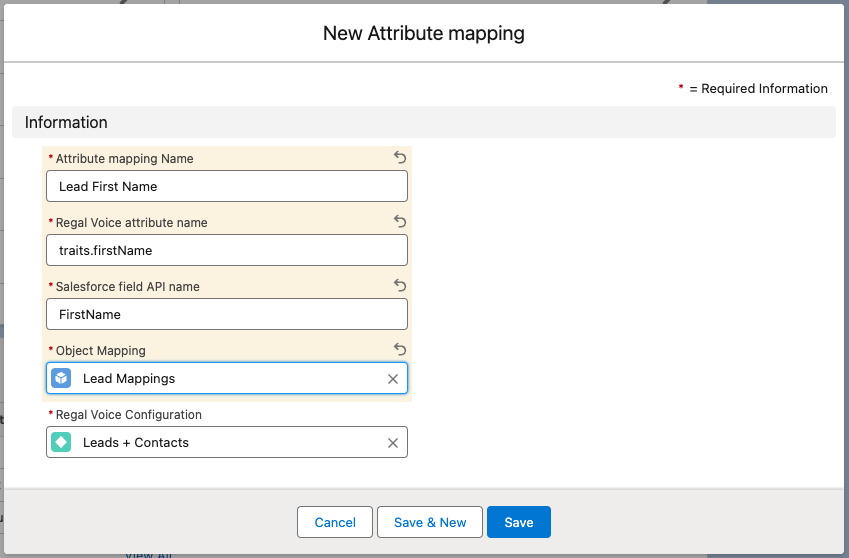
New Attribute Mapping Prompt
Salesforce Field/API names
To find API names of the fields of an object in Salesforce, go to Setup by clicking on the gear icon in the upper right corner of the page. Then select the Object Manager tab, open the object of interest, and select Fields & Relationships. Here you can see all fields with their Salesforce Field name. You can also explore the Salesforce Reference Guide.

Where to Find Salesforce Field Names
Basic fields to map include:
| Salesforce Field | Regal Attribute |
|---|---|
| Phone | traits.phone |
| traits.email | |
| FirstName | traits.firstName |
| LastName | traits.lastName |
| Status | traits.status |
| Id | userId |
For some fields you will want to create duplicate mappings - one for each object type that is relevant. For example, if your prospective customers start off as Leads and then at some point convert to Contacts, you should create similar field mappings for both Leads and Contacts. Usually Leads have a more limited set of fields so you just have to map those that are relevant for each object.

Basic mappings for Lead and Contact objects
Mapping Address Information to Regal
Regal supports syncing of address data, but requires a specific mapping pattern due to the way it is represented in Regal. For example, in order to map City you need to create an Attribute mapping where the "Regal Voice attribute name" is "traits.address.city". See additional examples below:
| Salesforce Field | Regal Voice Attribute |
|---|---|
| Street | traits.address.street |
| City | traits.address.city |
| State | traits.address.state |
| PostalCode | traits.address.zipcode |
| Country | traits.address.country |
Does not support read-only fields
Some fields, e.g. the Account Name in a Person Accounts configuration, are system-generated read-only fields and cannot be updated by our managed package. Avoid creating mappings for such fields as it will cause all updates to fail.
Step 5: Test Salesforce >> Regal data flow
Now that you've mapped fields from your Lead, Contact, Account, and/or Person Accounts, when you create or update these objects in Salesforce, the corresponding contact will be created or updated in your Regal account. Only those fields of the object that have an “Attribute mapping”, and for which the “Object field mapping config” object was created, will be synched.
- Test data flow by creating a new Lead object in Salesforce, then checking the Audience page in your Regal account.
A link back to the relevant Salesforce profile will automatically be available in Regal in the profile attribute called salesforceLink. Additionally, the externalId attribute on the profile in Regal point to the Salesforce Lead object ID. If a Lead is converted into a Contact, Account or Person Account, then the externalId attribute is updated to the corresponding object ID.

Contact in Regal
Enable Data Flow from Regal to Salesforce
Step 1: Connect your Salesforce org via OAuth
These steps are necessary in order for Regal events and data to make their way to your Salesforce organization.
System Admin recommended
It's highly recommended that a user with the System Admin profile in your Salesforce org is the one who goes through the OAuth flow to connect the Regal app.
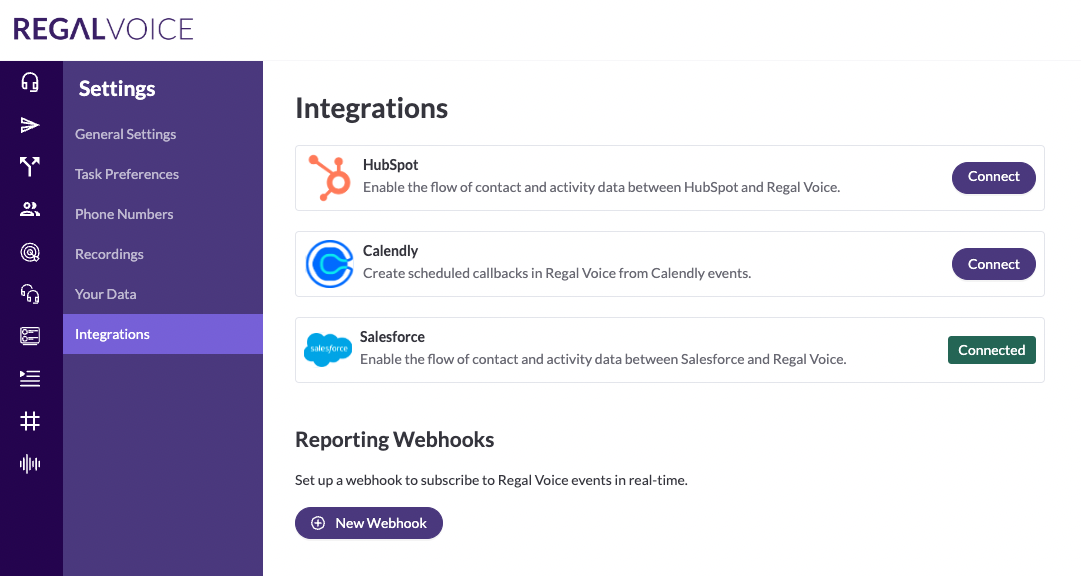
- In the Regal app, go to Settings > Integrations and find the Salesforce tile. Click Connect.
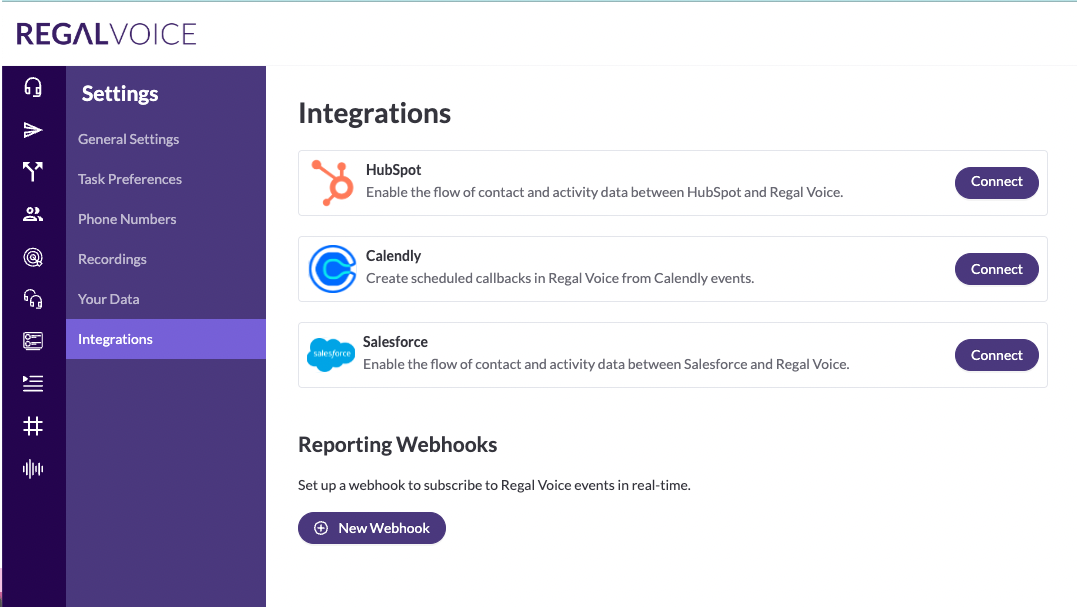
- In the connect modal, enter the domain name of your Salesforce org. login.salesforce.com (or test.salesforce.com for sandbox instance) works for most organizations unless you have a custom domain name. If using a custom domain, try {your custom domain}.my.salesforce.com.
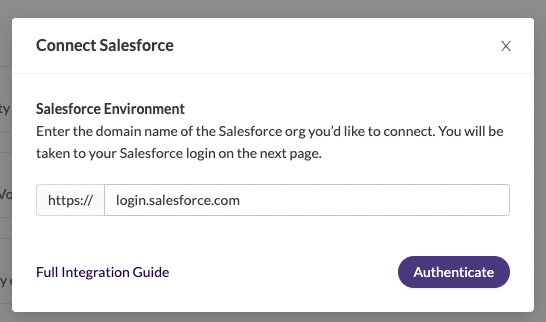
- Click Authenticate and follow the remaining OAuth flow by logging in with your Salesforce credentials. When you're done, you will be redirected back to the Regal app Settings page, where the Salesforce tile will show Connected.
Step 2: Add the Regal Voice Events component to your Salesforce object layouts
Now that you can receive Regal Voice events into Salesforce, the final step is to add a visual component to your Lead, Contact, Account or Person Account pages to display the events.
- Start by opening any Contact, then click the gear icon in the upper right corner, and select Edit Page.

Edit Page
- Scroll down the list of components on the left, find and drag the regalVoiceEventsComponent to the place on the profile you want Regal Voice events to appear, and click Save. (If this is your first time customizing this page in Salesforce you'll be prompted to go through an Activation flow. Keep clicking through until it's complete, then click Save.)

- Repeat for any other objects that you will sync to Regal.
Step 3: Test Regal >> Salesforce data flow
Now you should be able to create and edit contacts directly in Regal, then see the corresponding changes in your Salesforce objects. Only those fields of the object that have an “Attribute mapping”, and for which the “Object field mapping config” object was created, will be synched.
- Test data flow by going to the agent desktop in Regal and initiating an outbound sms to a new phone number. Try editing the name of the contact or any other attributes that you have mapped (you may first need to make these attributes editable through Settings > Your Data). Feel free to send an sms as well.
- Now go to your Salesforce org, find the relevant object (Lead, Contact, etc. depending on your mappings) and check that there is a new record created by changing Recently Viewed to All Contacts. Click into the record to see also that the Regal Voice Events component now has several events in the feed.

Regal Voice Events component with several events
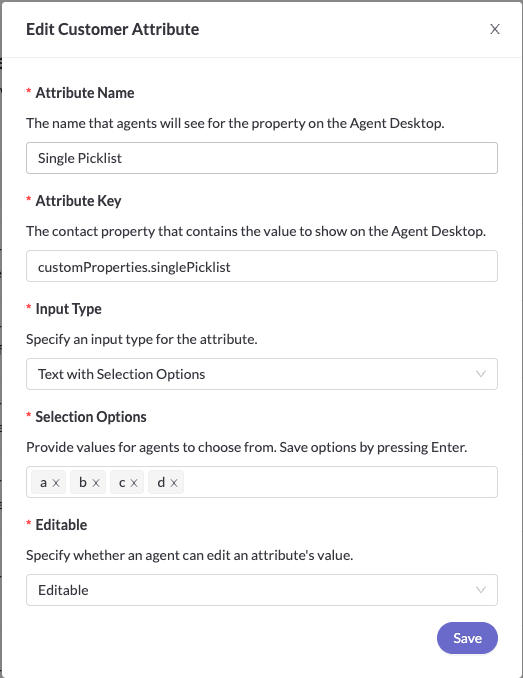
Match Regal Property Types with Salesforce Field Types
In the Regal app's Settings > Your Data, you can control which attributes can be displayed/edited in the Agent Desktop. To ensure that updates from Regal will properly sync back to Salesforce, choose the correct Input Type that corresponds with the Salesforce field type according to the table below.
| Salesforce Field Type | Regal Attribute Input Type |
|---|---|
| Checkbox | Yes/No |
| Currency / Number / Percent | Number |
| Text / Text Area | Single Line Text |
| Text Area (Long) | Paragraph Text |
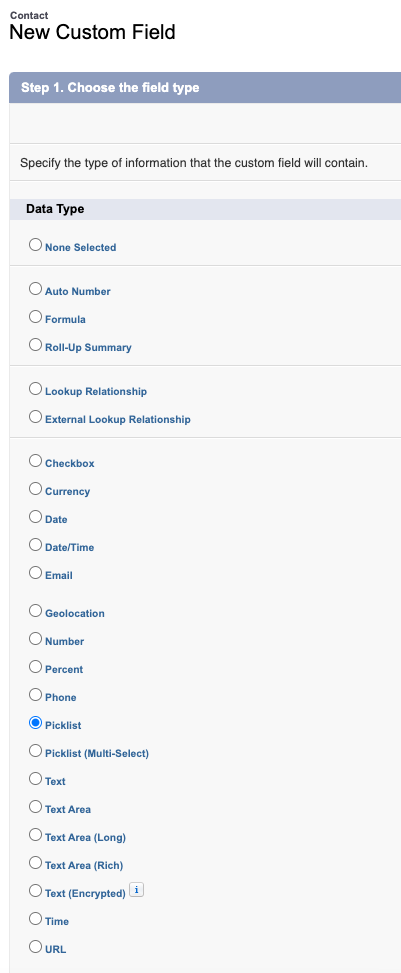
| Picklist | Text with Selection Options |
| Picklist (Multi-Select) | List with Selection Options |
| Picklist (Multi-Select), with unrestricted set of values | List with Free Text |
| Single Line Text | |
| Url | Single Line Text |
| Rich Text | (not currently supported) |
| Encrypted Text | (not currently supported) |
| Geolocation | (not currently supported) |
| Time | (not currently supported) |
Regal Attribute Type
Salesforce field type
This concludes the integration. Explore the Advanced Topics below that may be relevant to your org. If you have any questions about how to install the Regal Salesforce app or which contact properties are important to send to Regal, reach out to [email protected].
Advanced Topics
Sending Unique Identifiers to Regal
By default, all events for primary and secondary objects will contain the phone, email, and Salesforce object ID of the related primary object. Events for secondary objects will also include their respective Salesforce object ID.
- Primary objects are Lead, Contact, Account, or Person Account
- Secondary objects are Opportunity, Case, Event
- the Salesforce object ID of the primary object will be in the traits block, and takes the form salesforce_lead_id, salesforce_contact_id, or salesforce_account_id based on your selection for Desired Objects to Sync in the configuration in Step 2
- the Salesforce object ID of the secondary object will be at the top level of the json, and takes the form salesforce_opportunity_id, salesforce_case_id, salesforce_event_id, etc.
- Phone and email will also be in the traits block, and will only send if a mapping exists
Example 1: An update is made to a Contact record in Salesforce:
{
	"traits": {
		"firstName": "John",
		"lastName": "Doe",
		"phone": "(856) 559-7961",
		"email": "[email protected]",
		"salesforceLink": "https://regal6-dev-ed.my.salesforce.com/0038c000036blDJAAY",
		"salesforce_contact_id": "0038c000036blDJAAY"
	},
	"eventSource": "salesforce",
	"name": "Salesforce Contact Updated"
}
Example 2: An update is made to an Opportunity related to an Account:
{
	"traits": {
		"phone": "9735872432",
		"salesforce_account_id": "0018c00002fiuyJAAQ"
	},
	"salesforceLink": "https://regal6-dev-ed.my.salesforce.com/0068c00000vFX6WAAW/view",
	"salesforce_opportunity_id": "0068c00000vFX6WAAW",
	"properties": {
		"CloseDate": "2023-02-21",
		"Amount": 456.00,
		"StageName": "Needs Analysis",
		"Description": null,
		"Name": "testing name",
		"Id": "0068c00000vFX6WAAW"
	},
	"name": "Salesforce Opportunity Created",
	"eventSource": "Salesforce"
}
Mapping to userId:
Events will not contain userId by default, meaning that in Regal there will be no value showing for External Id. However, you can explicitly add an attribute mapping for userId like the following example:
- Regal Voice attribute name must be userId, not traits.userId
- Salesforce field API name: use Id to pass the inherent Object ID. You can also map phone, email, or any other custom value here.
Using multiple identifiers to sync Regal events to the right Primary objects in Salesforce
Events from Regal may include multiple identifiers, such as the userId, Salesforce primary object IDs, traits.phone, and traits.email (optional - check the appropriate box in the configuration object to utilize email). The Regal managed package in Salesforce will waterfall through all of these identifiers in the following order to take the appropriate actions:
- Are salesforce primary object IDs present in the event?
- No: continue to check userId
- Yes: query for matches using id against appropriate Configured Record Types
- Single match found: proceed with update/next steps
- Both Contact/Account record and Lead record found: proceed with update/next steps on the Contact/Account record
- No matches found: log an appropriate error, do not continue with update/next steps
- Is userId present in the event and mapping exists?
- No: continue to check traits.phone
- Yes: query for matches using userId mapping against appropriate Configured Record Types
- Single match found: proceed with update/next steps
- 1 Contact/Account record and any Lead records found: proceed with update/next steps on the Contact/Account record
- More than 1 Contact/Account records found: log an appropriate error, do not continue with update/next steps
- No Contact/Account records found, and more than 1 Lead record found: log an appropriate error, do not continue with update/next steps
- No matches found: continue to check traits.phone
- Is traits.phone present in the event and mapping exists?
- No: check config for whether to use Email
- Use Email FALSE: log an appropriate error, do not continue with update/next steps
- Use Email TRUE: continue to check traits.email
- Yes: query for matches using phone mapping against appropriate Configured Record Types
- Single match found: proceed with update/next steps
- 1 Contact/Account record and any Lead records found: proceed with update/next steps on the Contact/Account record
- No matches found: check config for whether to use Email
- Use Email FALSE: create a new record according to Configured Record Types
- Use Email TRUE: continue to check traits.email
- More than 1 Contact/Account records found: check config for whether to use Email
- Use Email FALSE: log an appropriate error, do not continue with update/next steps
- Use Email TRUE: continue to check traits.email to attempt to resolve
- No Contact/Account records found, and more than 1 Lead record found: check config for whether to use Email
- Use Email FALSE: log an appropriate error, do not continue with update/next steps
- Use Email TRUE: continue to check traits.email to attempt to resolve
- No: check config for whether to use Email
- Is traits.email present in the event and mapping exists?
- No: log an appropriate error, do not continue with update/next steps
- Yes: query on remaining records from previous step for matches using email mapping against appropriate Configured Record Types
- No traits.email in event or no mapping exists: log an appropriate error, do not continue with update/next steps
- Single match found: proceed with update/next steps
- More than 1 record found: log an appropriate error, do not continue with update/next steps
- None of the records match: log an appropriate error, do not continue with update/next steps
Using Subbrands with Salesforce
If you are defining Subbrands to use in Regal's Identity Resolution process, then you'll need to also add a traits.subBrand attribute mapping in the Salesforce Regal Configuration to ensure that the right records are being synced in both directions. When the salesforce primary object IDs or userIds are not present in an event (e.g. fresh inbound call events), the integration will use the phone/email + subbrand to correctly identify the record.
Tracking Salesforce Opportunities in Regal
The integration will send Opportunity events from Salesforce to Regal whenever an Opportunity is created or updated:
- Salesforce Opportunity Created
- Salesforce Opportunity Updated
These can be used to trigger Journeys, but are also used to automatically build up Opportunity objects in Regal. To configure the visibility of these objects in the agent desktop, follow this guide. Editing the Opportunity in one system will automatically update the other.
Send Opportunity data as Contact Attributes: Optionally, you can also choose to sync Opportunity properties to contact attributes in Regal, which can be useful for referencing in Journeys. By checking this box in the configuration, the apex code will include a traits block in the above events to Regal which duplicates the data already present in the properties block. This will allow the Regal app to interpret the data as contact attributes, thus showing those Opportunities in the contact profile slide out, as well as in Agent Desktop. Note: enabling this feature will add a hidden property called Regal Friendly Identifier to your Opportunities upon create/update. The friendly ID will also be sent in the traits block in the event (see example schema below) in the form of "salesforce_opportunity_x". This is required in order to consistently maintain a mapping between the two systems, but can result in a large number of updates behind the scenes.
Example: An Opportunity Updated event that includes the data in the traits block:
{
  "userId": "0038c00003DNHDqAAP",
  "traits": {
    "salesforce_opportunity_3": {
      "salesforceLink": "https://regal6-dev-ed.my.salesforce.com/0068c00000vGjaLAAS",
      "Id": "0068c00000vGjaLAAS",
      "opportunityAmount": 123456,
      "opportunityStage": "Needs Analysis",
      "opportunityDescription": "some description",
      "opportunityName": "Example Opportunity"
    },
    "phone": "18563907327",
    "salesforce_contact_id": "0038c00003DNHDqAAP"
  },
  "salesforceLink": "https://regal6-dev-ed.my.salesforce.com/0068c00000vGjaLAAS",
  "salesforce_opportunity_id": "0068c00000vGjaLAAS",
  "properties": {
    "Id": "0068c00000vGjaLAAS",
    "opportunityAmount": 123456,
    "opportunityStage": "Needs Analysis",
    "opportunityDescription": "some description",
    "opportunityName": "Example Opportunity"
  },
  "name": "Salesforce Opportunity Updated",
  "eventSource": "Salesforce"
}
Notes for the Regal Friendly Identifier added to Opportunities
- Friendly IDs will be ordinal (e.g. 1, 2, 3, etc.) and unique only within the set of Opportunities related to an Account/Contact.
- When first enabling this feature, an update to any Opportunity will trigger adding the friendly ID to all other Opportunities related to the same Account/Contact. Starting from 1, the friendly ID values will be ascending with the create date order of the Opportunities.
- When creating a new Opportunity, the friendly ID will increment by +1 relative to the current highest friendly ID among all the other Opportunities associated with the same Account/Contact. This count will also respect any Opportunities that were soft deleted, but not hard deleted.
- To protect against hitting transaction limits, this feature will not trigger for Contacts/Accounts with over 100 related Opportunities, though you can change this limit by going to Setup > Custom Metadata Types > Regal Constants > Manage > Opportunity Identifier Threshold.
Update Opportunities from contact events When this box is checked, a user can make an update to Opportunity data shown in the contact attributes in Agent Desktop and then see the change to the corresponding Opportunity in Salesforce. The package code will monitor any incoming contact.attribute.edited Regal events containing updates to Opportunities in order to achieve this. This configuration option can only be used if the the previous option is also used.
Attribute Mappings for Salesforce Opportunity Objects
As with the Primary objects like Leads, Contacts, Accounts, you can create attribute mappings for Opportunity objects. This will allow for more precise control over syncing Opportunities w/ Regal. If an active config for Opportunity attribute mappings exists, then Opportunity Updated events will only send to Regal when those properties are updated. This is useful if you have automated processes in your Salesforce org that are regularly touching & updating Opportunities, but those updates are not necessary to sync w/ Regal.
To use this feature, follow these steps:
Step 1: From within a Regal Voice Configuration, create a new Object field mapping config, and select "Opportunity" from the Object type dropdown. Click Save.
Step 2: Create a new Attribute mapping, and choose a descriptive Name.
Step 3: Enter the relevant Regal Voice attribute name. Note: this must be preceded by "properties." in order to correctly send the data to Regal (and not "traits." as with mappings for Leads, Contacts, etc.)
Step 4: Enter the corresponding Salesforce field API name.
Step 5: Select the Opportunity mapping config you created in Step 1. Click Save.
Step 6: Repeat 2-5 as necessary for all desired attributes on the Opportunity object.
When Opportunity mappings are active:
- Only changes to mapped properties will trigger outbound events to Regal
- Outbound events to Regal will only contain the mapped properties
- Only mapped properties will be updated by inbound events from Regal
- All property names sent in events to Regal will use the value you provide in "Regal Voice attribute name" in the mapping modal.
When Opportunity mappings are not active (or don't exist), the following defaults will apply:
- Any change to an Opportunity will trigger an outbound event to Regal
- Outbound events to Regal will contain all properties of the Opportunity
- All property names sent in events to Regal will use the Salesforce API names
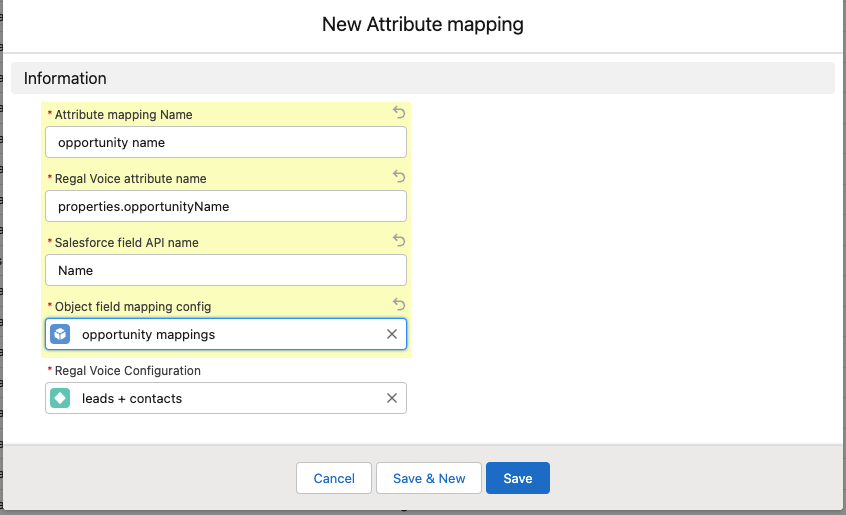
Selectively syncing at the record-level
By default, the Regal managed package in Salesforce will send an event to Regal anytime a mapped attribute is updated on a Salesforce record, regardless of the value of the update or any other properties of the record. By enabling the following configuration options, however, you can control at the record-level whether or not to send the event to Regal.
Step 1: Choose an object type you want to selectively sync, and pick a checkbox (boolean) field that will control whether the records of that object should be synced. For example, you can add a new checkbox field called "Sync to Regal" to the Contact primary object, or re-purpose an already existing field.

Step 2: Based on your own business logic, for each record, set the value of the field you chose in Step 1 to TRUE for records that should sync, and FALSE otherwise. The options for implementing this are 1) make the new field a formula field, 2) use a custom flow to set the value of the field, and 3) use code to set the value of the field. However you choose to do so, you are responsible for setting the value of this field.
Step 3: In your active Regal Voice Configuration object, find the related Object Mapping, and enable the "Selectively sync records" option. Also enter the Salesforce API name of the field you chose in Step 1. Save.
Events for Secondary Objects may still end up creating Contacts in Regal
Even if you enable selective syncing on Primary object records (Leads, Accounts, Contacts, Person Accounts), if an update event for a secondary object (Opportunities, Cases, Events) is sent to Regal then it will still end up creating a contact in Regal for the related Lead/Account/Contact.
For Opportunities, this is easily handled by creating mappings for Opportunities and enabling selective sync on Opportunity records in addition to the Lead/Account/Contact.
For Cases and Events, however, there is currently no support for mappings or selective syncing. You can however disable entirely the sending of any events related to Case or Event objects.
Tracking Salesforce Calendar Events in Regal
Similar to the Salesforce Opportunities, our integration can receive events related to the Calendar Event object, which can be used to trigger Journey automations such as scheduled callbacks.
- Will send the following events:
- Salesforce Event Created, Salesforce Event Updated, Salesforce Event Canceled
- API events will include:
- salesforce_event_id that references the related Calendar Event object
- all properties, including custom properties, of the Calendar Event object
- email and name of the Salesforce User assigned to the Calendar Event, which can identify the agent in Regal to make sure tasks are assigned to the right person
Tracking Salesforce Cases in Regal
Similar to the Salesforce Opportunities, our integration can receive events related to the Case object, which can be used to trigger Journey automations such as task reminders.
- Will send the following events:
- Salesforce Case Created, Salesforce Case Updated, Salesforce Case Canceled
- Salesforce Case Comment Added, Salesforce Case Comment Edited
- API events will include:
- salesforce_case_id that references the related Case object
- all properties, including custom properties, of the Case object
- email and name of the Salesforce User assigned to the Case, which can identify the agent in Regal to make sure tasks are assigned to the right person
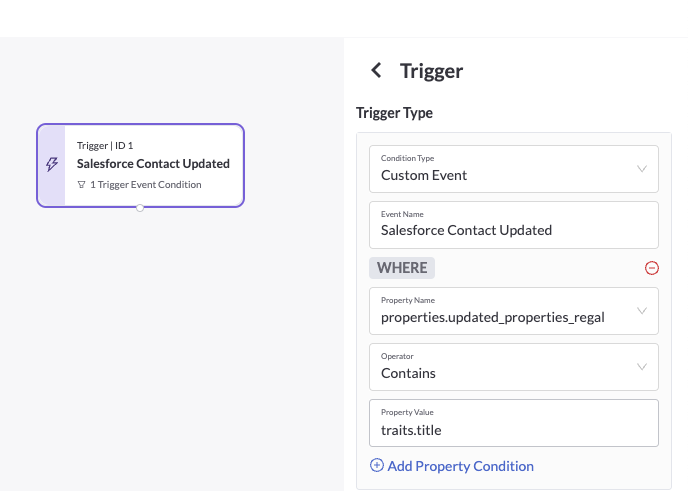
Triggering Journeys off Changes to Specific Attributes
All "Salesforce X Updated" events (e.g. "Salesforce Contact Updated", "Salesforce Opportunity Updated", etc.) now include lists of the attributes that were changed in that event. Specifically, there will be two arrays, found in the properties block of the json body:
- updated_properties_regal: contains a list of the mapped attribute names of the fields that were updated in this event
- updated_properties_sf: contains a list of the corresponding Salesforce API names of the fields that were updated in this event
{
	"traits": {
		"firstName": "John",
		"lastName": "Doe",
		"phone": "(856) 559-7961",
		"email": "[email protected]",
		"title": "some title",
		"salesforceLink": "https://regal6-dev-ed.my.salesforce.com/0038c000036blDJAAY",
		"address": {
			"street": "123 sesame st",
			"city": "somewhere"
		},
		"optIn": [{
			"channel": "email",
			"subscribed": true
		}],
		"salesforce_contact_id": "0038c000036blDJAAY"
	},
	"eventSource": "salesforce",
	"name": "Salesforce Contact Updated",
	"userId": "0038c000036blDJAAY",
	"properties": {
		"updated_properties_regal": ["traits.lastName", "traits.email", "traits.title", "traits.address.street"],
		"updated_properties_sf": ["LastName", "Email", "Title", "MailingStreet"]
	}
}
This data in the events enables Journeys to check for a specific attribute name in the trigger conditions.
Managing Opt In
If all of your Salesforce Leads or Contacts are opted in to sms and voice, and you want Regal to automatically opt them in as well, then just select "All profiles are subscribed to {{channel}}" in the Regal Voice Configuration in Step 2.
If, however, not all Leads or Contacts should be automatically subscribed, then you need to map dedicated opt-in fields from Salesforce to Regal. To do so, the field in Salesforce must be a checkbox field on the Lead/Contact/Account/etc. Then you need to create an Attribute mapping, where the “Regal Voice attribute name” is “optIn.voice.subscribed” or “optIn.sms.subscribed." See example below.

SMS Optin mapping example
Pre-existing Contacts will not reflect accurate Opt-in in Regal
Opt In data is only sent from Salesforce to Regal when a Lead/Contact/Account/Person is first created, or if the phone number is updated, but not when the Lead/Contact/Account/Person is updated.
This means that any contacts that existed prior to installing the Regal managed package into your Salesforce org will not have had any "Salesforce X Created" event with the opt in data, sent to Regal, and thus the corresponding contact in Regal will default to False for all subscriptions.
The best course of action to guarantee all your contacts have accurate Opt In values is to do a csv upload in Regal which backfills the pre-existing contacts. Your Regal implementation manager can assist in setting this up.
Logging Regal Calls and SMS tasks to Salesforce Tasks
To use this feature, check the Configuration box labeled "Sync Regal calls and sms to SF Tasks".
When enabled, call and SMS tasks in Regal will result in corresponding Salesforce Task objects created and tied to the relevant Salesforce Contact/Account/etc.
- Details from call or SMS events will be populated in the SF Task, including: Type, SubType, Subject, Status, Direction, Disposition, Call Duration, Handle time, Campaign Name, Campaign ID, Recording link, Agent Tags, Owner Id, Regal Phone
- The content of sms.sent and sms.received messages will be continually appended to the Comment/Description field of the SF Task with the same conversation_id until the sms.conversation.completed event is received, at which point the agent's task notes will be appended at the end, and the Task status will be marked Completed
- For Owner Id, the handling agent email in Regal will be used to attribute the SF Task to the corresponding User in Salesforce - if the User cannot be identified using the agent's email, then this will default to the Integration User.
Linking RVEs and SF Tasks to Opportunities
By default, RVE objects and SF Tasks created by Regal will be connected to the relevant primary object record (Lead/Contact/Account), but you can additionally connect them to Opportunities. To do so:
- ensure you have a mapping for the Opportunity ID, as shown:
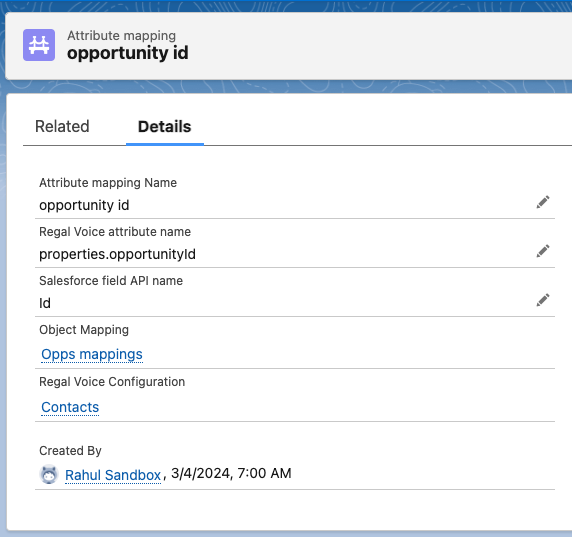
- trigger Journeys using the Salesforce Opportunity Created/Updated events
Any tasks created by a Journey triggered by an Opportunity event will then have the opportunity ID in its details, so when the task events reach Salesforce the package will be able to connect it to the correct Opportunity.
Limitations with Accounts & Opportunities
If your configuration is syncing Accounts to Regal (as opposed to Contacts), then Task objects in Salesforce can only be connected to either the Account or the Opportunity (because both populate the WhatId). By default the package chooses Accounts, but you can change this behavior by switching a flag in Regal Constants.
sms.received Limitations
Generally sms.received can be connected back to an in-progress conversation/task in Regal, which then enables it to be connected to the right Opportunity in Salesforce. However, if the conversation/task is already closed, or has expired after 15 days, then the sms.received would begin a new conversation and not have a connection to any Opportunity.
Showing Lead/Contact/Account RVEs on Opportunities
In the RegalVoiceEvent visual component on Opportunity records, instead of showing just the RVE objects connected to an Opportunity, you can alternatively choose to show all the RVEs from the related Lead/Contact/Account.
To do this, Go to Setup > Custom Metadata Types > Regal Constant > RVE_LOOKUP_CONFIG. Change Value from OPP_ID to PROFILE_ID, and Save.
Mapping Read-only Fields
This topic pertains to mapping fields in Salesforce that are read-only, formulas, or system generated. In all cases, the field will sync to Regal, but in some cases they will not trigger a sync to Regal when updated (see the table below). This is a known Salesforce limitation, and a good rule-of-thumb to understand when it will trigger a sync or not is whether there will be a refresh on the record. In most cases, the field is just calculated/rendered in the UI and there is no actual database update occurring. Such fields will only sync to Regal when some other update to the record triggers a sync.
If it's necessary to keep these fields synced in real time, one common workaround is to create a Custom Flow or scheduled process which updates something else on the record whenever the read-only would be updated.
| Scenario | Example | Sync Behavior |
|---|---|---|
| A formula involving multiple editable fields on the same object | fieldA = function( fieldB , fieldC ) | will trigger a sync as expected |
| Rollup Summary | on an Account record, a field which sums all the Amounts across related Opportunities | will not trigger an Account Updated sync upon a change to one of the Opportunity Amounts in the rollup |
| A formula involving fields on a related object | on an Opportunity record, show the related Account's source | will not trigger a sync when the Account's source is updated |
| Dynamic Functions in formula fields | a formula field to calculate the number of days since the record was created: TODAY() - DATEVALUE(CreatedDate) | will not trigger a sync as the date changes |
| Autonumber | Case number | will trigger a sync the first time the record is created, but is not subject to change afterwards |
| Standard non-editable fields | Id, CreatedBy, LastModifiedDate, etc. | will trigger a sync as expected |
Logging & Archival Policy
The package will log all inbound & outbound Regal-related API events, as well as runtime errors, viewable in the Logs tab of the Regal Salesforce app. By default, logs will be stored for 180 days, but this lookback period can be configured by your Salesforce admin.
To change this lookback period, go to Setup > Custom Metadata Types > Archival Policy Config > Manage Archival Policy Configs. From here, you can click Edit on "Archival Policy - Logs" and change the "Number of Days To Purge" value.
The integration will also automatically add an archival policy for Regal Voice Events, which is inactive by default. This can be activated and modified following the same steps above.
Enhanced Logging
Enhanced logging will create additional logs in the Log table, and each log will have more details:
- non-error warnings, infos, etc. captured in message field
- more details like stack traces and how the code was executed
Inactive by default, but can be enabled when needed for debugging: Setup > Custom Settings > Enhanced Logger Setting > Edit > check Active > Save or New > select User or Profile.
Changing default timeout duration for callouts to Regal app
The timeout duration defaults to 10 sec, but this can be changed in Setup > Custom Metadata Types > Regal Constants > Manage Regal Constants.
Backfilling already existing contacts
If you'd like to backfill existing Salesforce contacts into Regal, download your contacts and properties from Salesforce and share the file in a secure way (for example, you can password protect the excel file then email it [email protected] and share the password over slack).
Release Notes
- v1.92 - 7/2/2024
- new feature: updated the record lookup process with special treatment for traits.subBrand. See Advanced Topics for more info.
- fixed bug: call notes >255 characters were being truncated when copying to Task objects. Now we included an additional field on the RVE object that contains the whole content (Notes_Long__c). You may need to update the record layout to see it.
- v1.91 - 5/30/24
- new feature: Opportunity Created/Updated events can be used to create corresponding Opportunity objects in Regal. Editing the Opportunity in Regal can sync updates back to Salesforce. See Advanced Topics for more info.
- improvement: addresses some race condition possibilities for Task object creation.
- fixed bug: some special characters in journey or campaign names (e.g. "<>") were not handled by the package, resulting in 500 errors back to Regal, but now the package can parse the json correctly.
- v1.90 - 4/23/24
- new feature: RVE and Task objects created by the package can be related to triggering Opportunities. See Advanced Topics for more info.
- improvement: Task Due Dates are populated with the task completion date from call.completed and sms.conversation.completed events
- improvement: Regal Phone property added to Task objects
- v1.86 - 3/25/24
- new feature: "Regal Admin Console" page to manage your authentication settings with Regal. Also flashes a warning banner when the API key is missing.
- new feature: can now use salesforce object IDs sent in events from Regal to attribute to the correct record in Salesforce.
- improvement: added security checks for authorized users, permission sets, and other refactoring
- fixed bug: properties updated to
nullwere not being includedupdated_propertiesarrays, but now they are. - fixed bug: nightly error logs stopped sending if configuration is disabled and re-enabled; now they will be re-initiated upon a configuration being set to active.
- v 1.76 - 12/7/23
- new feature: can now decide which individual records should be synced to Regal instead of all Leads, Contacts, Accounts, Opportunities being subject to a sync. See Advanced Topics for more info.
- improvement: optimized the number of queries for RVE creation.
- improvement: storing unique event IDs on RVE records, which will help with debugging or reprocessing events when needed.
- v 1.67 - 9/18/23
- fixed bug: sms.sent and sms.conversation.completed events from Regal were failing to create RVE objects in Salesforce when the content size was too large. Now works as expected.
- v 1.65 - 9/13/23
- new feature: can now utilize userId, salesforce object IDs, phone number, or email to sync events from Regal to the appropriate Lead, Contact, Account, or Person Account record in Salesforce (instead of relying only on phone number). See Advanced Topics for more info.
- new feature: can now support contact.experiment.assigned events from Regal
- improvement: can now accept batch API updates from Regal so that high-volume activity does not get gated by Salesforce API limits
- improvement: the timeout for outbound requests to Regal can now be configured. See Advanced Topics for more info.
- fixed bug: opt-in block was not being sent for traits.email updates. Now works as expected.
- v 1.61 - 8/23/2023
- improvement: optimized batch job creation to only happen when relevant attributes are updated
- improvement: enhanced logging for observability
- v 1.58 - 7/25/2023
- new feature: can now sync "Text Area (Long)" fields in Salesforce with "Paragraph Text" properties in Regal
- improvement: userId added to Regal Voice Event (RVE) object properties.
- v 1.57 - 7/19/2023
- new feature: can now sync "Checkbox" fields in Salesforce with "Yes/No" boolean properties in Regal
- new feature: can now sync "Currency/Number" fields in Salesforce with "Number" properties in Regal
- new feature: can now sync "Picklist" fields in Salesforce with "Text with Selection Options" properties in Regal
- new feature: can now sync "Picklist (Multi-select)" fields in Salesforce with "List with Free Text" properties in Regal
- improvement: Contact Email added to Regal Voice Event (RVE) object properties.
- improvement: update verbiage of Regal Voice Configuration object for more clarity.
- improvement: accommodate lowercase mapping of id to userId for more flexibility.
- improvement: refactoring cleanup of system debug statements, empty code blocks, and unused variables, classes, pages, triggers.
- v 1.53 - 6/26/2023
- new feature: When call tasks and SMS conversation tasks are completed in Regal, the package will create and log Salesforce Task objects on the corresponding Salesforce Contact/Account/etc. See Advanced Topics for more info.
- fixed bug: numeric and datetime fields in Regal events (e.g. talk_time, created_at) were being stored as strings in RegalVoiceEvent objects. Now additional fields are created on RVEs with the correct data types.
- fixed bug: inbound events were sometimes attributed to the wrong record in Salesforce due to a faulty phone number query. Now more robustly identifies the correct record to attribute events to.
- v 1.51 - 5/22/2023
- new feature: MMS sent and received events will now create corresponding Regal Voice Event (RVE) objects
- new feature: can now sync "Picklist (Multi-select)" fields in Salesforce with "List with Selection Options" properties in Regal
- improvement: refactored trigger logic to use Queueable Dispatcher-Worker model for secondary Objects as well
- improvement: implemented caching of configuration details to reduce number of SOQL queries
- fixed bug: "content" property from SMS events was not populating the corresponding RVE objects. Now works as expected.
- fixed bug: Queueable Dispatcher-Worker model did not work in all cases. Now works as expected.
- fixed bug: updating any attribute in Regal with a comma (,) would not sync to Salesforce
- fixed bug: long text updates in Regal would get truncated in Salesforce. Now works as expected.
- v 1.45 - 4/21/2023
- improvement: refactored trigger logic to use Queueable Dispatcher-Worker model in order to robustly accommodate client org activity.
- fixed bug: when using mapped Opportunities feature, updates to Opportunity data in Regal would not update corresponding Opportunity records in Salesforce. Now works as expected.
- v 1.44 - 4/3/2023
- new feature: can now create attribute mappings for Opportunity objects, similar to Lead, Contact, etc. This will allow for more precise control over sending Opportunity events to Regal only when relevant Opportunity fields are updated. See Advanced Topics for more info.
- fixed bug: the SalesforceLink included in Opportunity events to Regal was improperly formatted and thus didn't work. Now works as expected when clicked from within the Regal app.
- v 1.43 - 3/14/2023
- new feature: all "Salesforce X Updated" events now include a list of the attributes that were changed in that event. This enables creating Journeys that will trigger when a specific attribute is updated, whereas before could only check whether an attribute equals a specific value. See Advanced Topics for more info.
- improvement: nightly error logs now include additional context such as the domain url of the salesforce instance, and summary stats of how many inbound & outbound events
- fixed bug: updates to opt-ins in Regal would not update mapped checkboxes in Salesforce. Now works as expected.
- fixed bug: Salesforce package was returning an error code to Regal when it received a json payload with duplicate properties. Now parser has been updated to remove duplicates correctly.
- fixed bug: when using an Accounts configuration, creating a calendar Event on an Account with linked Contact would not send a Salesforce Event Created event to Regal. Now works as expected.
- v 1.41 - 2/6/2023
- new feature: can now send Opportunity data to Regal as contact attributes so that they will appear in the Contact profile slide out and in Agent Desktop. Can also update Opportunity data in Agent Desktop and see the corresponding change made to the Opportunity in Salesforce (see Advanced Topics for instructions).
- new feature: events to Regal will now include new salesforce-specific identifiers, such as salesforce_contact_id, salesforce_lead_id, etc., and will no longer send userId automatically. For brands that still need to send userId, they can now add an explicit attribute mapping (see Advanced Topics for instructions). This will allow for smoother stitching of profiles in Regal, especially in cases where there is a parallel integration with another data source, e.g. CDPs like Segment.
- new feature: additional configuration options that provide more control over sending events for secondary objects to Regal (e.g. Opportunities, Calendar Events, Cases, etc.). (See Step 2 above).
- improvement: objections array in events from Regal (e.g. in call.completed events) will populate on the Regal Voice Event object so that it can be used to trigger flows
- improvement: new archival policy for Regal Voice Events (inactive by default)
- improvement: new list view in Logs tab for 'Active Configurations' so that it’s easy to make sure there are not two configurations active at once
- improvement: sandbox orgs will now also send nightly error log notifications
- fixed bug: Queueable-type triggers in Salesforce would cause error. Now we can support triggers from batch update, manual update, queueable update, and api update.
- fixed bug: batch update size was calculated incorrectly, resulting in negative batch sizes, and was also not a handled exception. Now logic is updated, is behind isActive flag, and all code is behind exception handling.
- v 1.32 - 11/18/2022
- improvement: send phone number and email in every event if mapped and available
- improvement: opt-in values send every time the phone number or email are updated
- improvement: validation rules will block saving invalid mappings in the configuration
- fixed bug: updating properties with double quotes " or line jumps would result in error when sending event to Regal. Now all string values are escaped prior to sending events to Regal
- v 1.31 - 11/7/2022
- new feature: SF Case object triggers events to Regal
- improvement: support RV >> SF updates for address mappings
- improvement: all events sent to Regal will include event names so that they show up in Recent Activity page
- improvement: in addition to errors, all inbound & outbound requests will be logged in Salesforce to facilitate debugging
- improvement: configurable archival policy for logs history so that Regal activity data doesn't use up all of brand's Salesforce storage
- improvement: error logs will send every night even if there were no errors that day, and will include additional metadata such as the package version and all configuration details
- fixed bug: batch updates to SF objects (usually via some external process) would not trigger events to Regal. Now they will work like any other update to SF objects.
- v 1.25.2 - 10/11/2022
- improvement: send all mapped attributes in every event to Regal prevent data becoming out of sync
- fixed bug: if any invalid mapping existed, all updates from SF >> RV would fail
- v 1.24 - 9/30/2022
- fixed bug: if Lead/Contact/etc. is created in Salesforce without a phone number, no event was sent to Regal. Now we do want to create contacts in Regal even if there is no phone number.
- fixed bug: decimal/currency fields not updating in RV >> SF direction. Now we can infer from the type of the mapped field whether to attempt to convert the string from Regal.
- v 1.22 - 9/20/2022
- fixed bug: if more than 10 attribute mappings exist for an object, updates in RV >> SF direction would fail
- fixed bug: sms sent, received, conversation completed events did not show in Regal Events component if "All profiles are subscribed to sms" was unchecked. Also fixed similar issue for voice related events.
- fixed bug: in RV >> SF direction, text fields that were too long caused an error. Now data will be truncated without returning an error response to Regal.
- fixed bug: incorrect domain on salesforceLink in custom properties.
- v 1.21.6 - 9/8/2022
- improvement: support SF >> RV updates for address mappings
- improvement: implemented daily logging for all caught exceptions
- fixed bug: if any invalid mapping existed, all updates from RV >> SF would fail
- fixed bug: updates to Opportunities were not flowing to Regal in all cases
- fixed bug: "contact was created" checkbox in config was in the wrong place. Moved to Events section of config.
- v 1.20.16 - 8/18/2022
- new feature: SF Event object triggers events to Regal
- new feature: SF Account object can sync w/ Regal contacts
- improvement: catch all exceptions in the app without causing brand's operations to fail
- fixed bug: RV >> SF attribute updates did not work for custom properties
Updated 24 days ago