Kustomer
Create custom objects from Regal events on a customer's timeline in Kustomer
This guide describes how to get Regal events like sms and calls to appear on a customer's timeline in Kustomer.
Create custom objects from Regal events in Kustomer
If you use Kustomer as your CRM and would like Regal SMS and Phone Calls to appear in the Customer Timeline of a customer's profile, follow the steps below to create custom objects from Regal events. Additionally, you can reference Kustomer's documentation directly.
First time bringing 3rd party events into Kustomer
You need to be an Admin in your Kustomer account to access this feature.
Also, If this is your first time bringing 3rd party events into Kustomer, we recommend contacting your Kustomer account manager to set it up with you. One of our Integration Managers can also hop on a call with your Kustomer account manager to work through it live.
Set up Inbound Webhook
Step 1: In Kustomer, set up an Inbound Webhook.
- Go to Settings> Platform > Inbound Webhooks
- Select Add Inbound Webhook.
- Fill out the name and description of the new webhook.
- Choose the desired type of hook as "webhook"
- Then, select Create to save the new webhook.
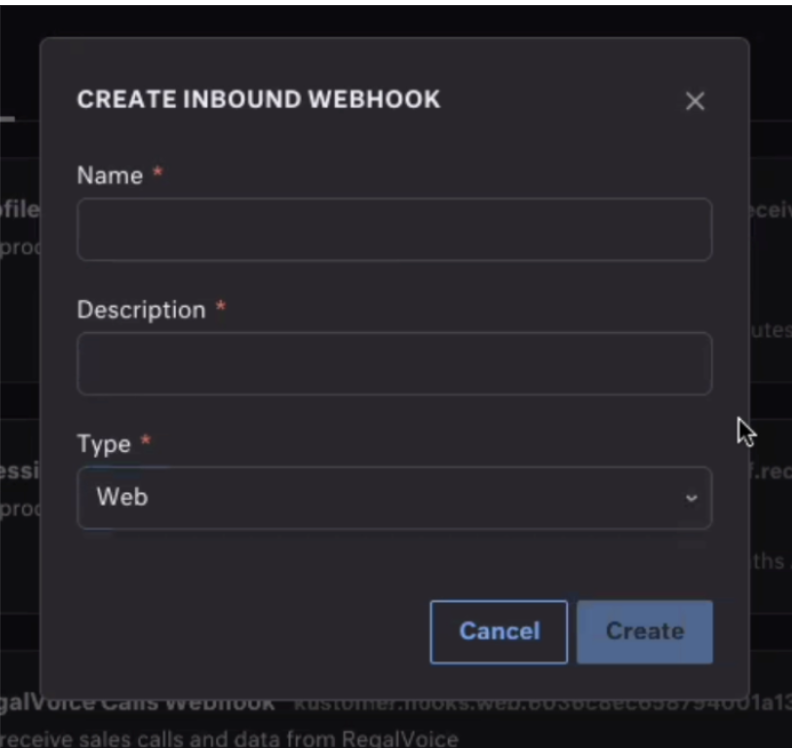
Add Inbound Webhook
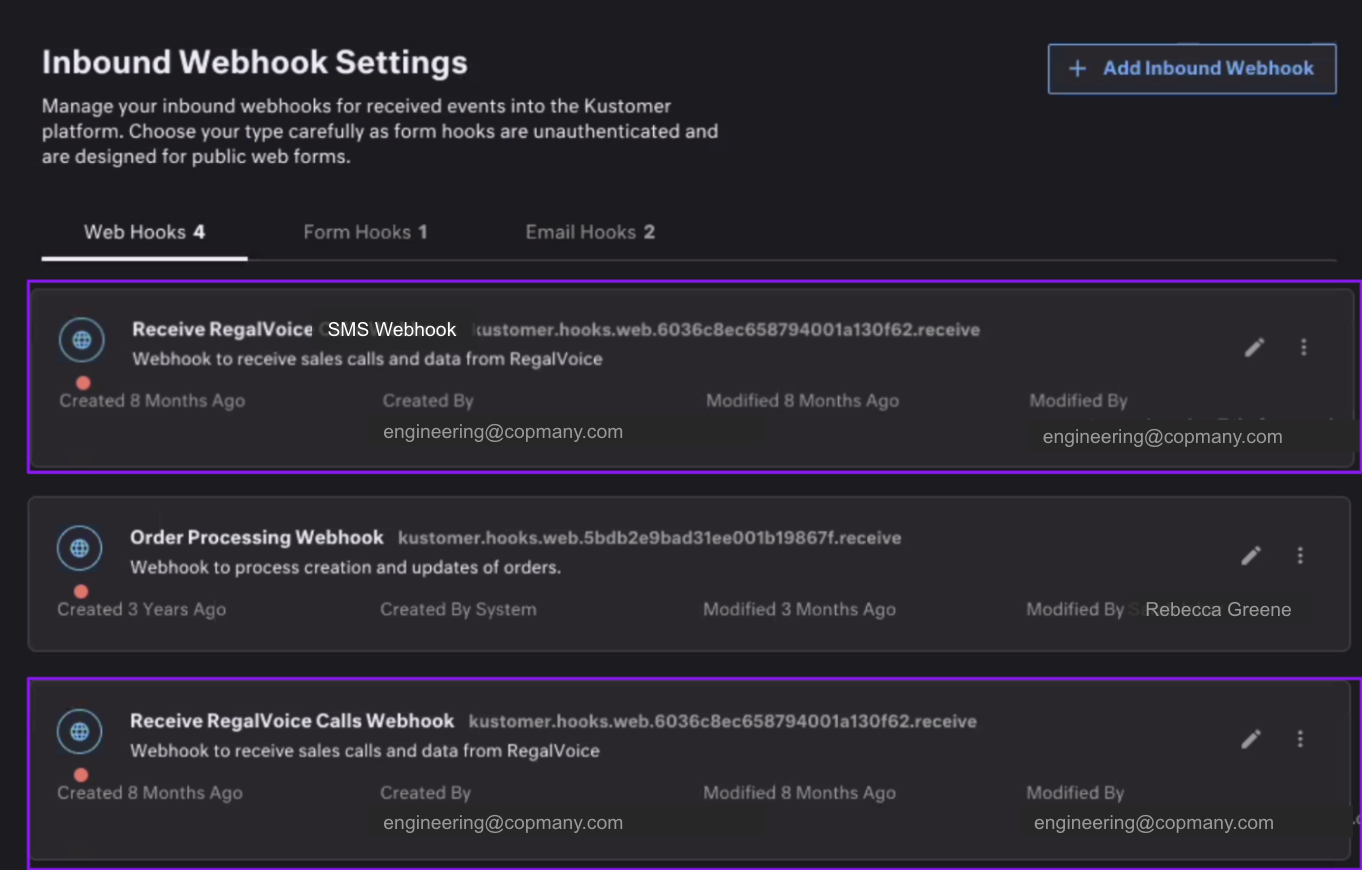
Inbound Webhook Settings
Step 2: Send the "hook address" to Regal. This is how Regal knows where to send your events.
Set up a custom Klass and custom attributes
Step 3: From the Klass settings page, set up a custom Klass. Create a Klass for each type of Regal event you want to show up in the Customer Timeline on a customer's profile. Each "Klass" represents a card on the Customer Timeline view. See below the events that Regal publishes to Kustomer. When you create a custom Klass, you can define the name, icon, and color of the Klass.
To create a custom Klass:
- Go to Settings and select Platform > Klasses.
- Select Add Klass.
- Enter a name. Optionally, select an icon and enter a description.
- Select Create.
- Add custom attributes to a Klass
- You can add attributes to both standard and custom Klasses.
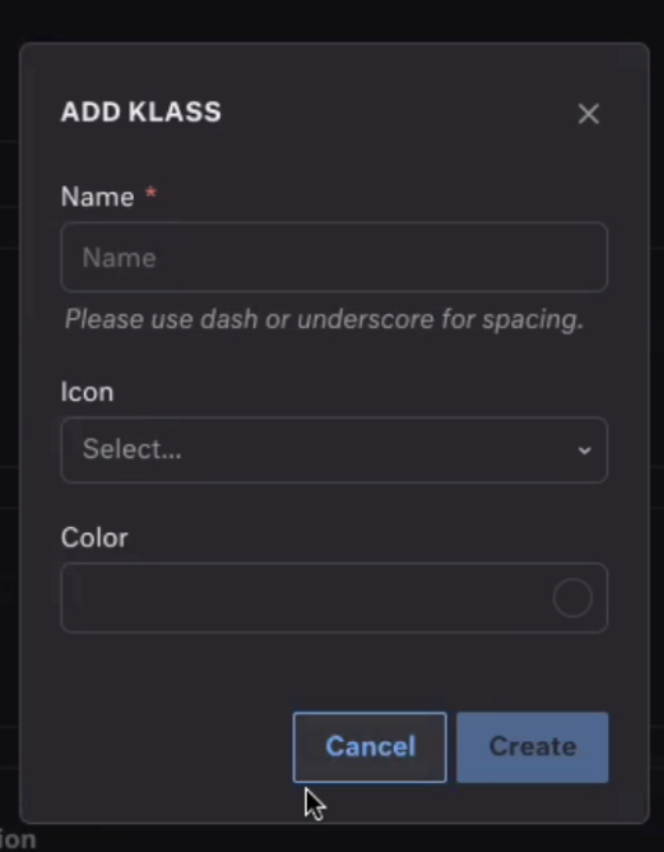
Add Inbound Webhook
Step 4: Create custom attributes for the data you want to show up in each card. See below the event schema and properties Regal makes available for each event.
To add an attribute:
- From that object's page, select Create Attribute.
- Enter a display name for the attribute. When you create the new attribute, Kustomer will automatically generate the attribute's name based on the Display Name and data Type.
Name and data Type cannot be changed
An attribute's Display Name and Value properties can be changed after creation, but Name and data Type cannot.
- Select a data type from the Type drop-down menu.
- Select the field value for the attribute type. (Single Value are fields that accept any value that matches the data type. Option List will only accept pre-defined values.)
- Select Create.
- Continue adding the necessary attributes for that Klass.
- Once you are done adding attributes, you must enable them in order to use them and customize their view. To enable an attribute, turn on the toggle for it in the list.
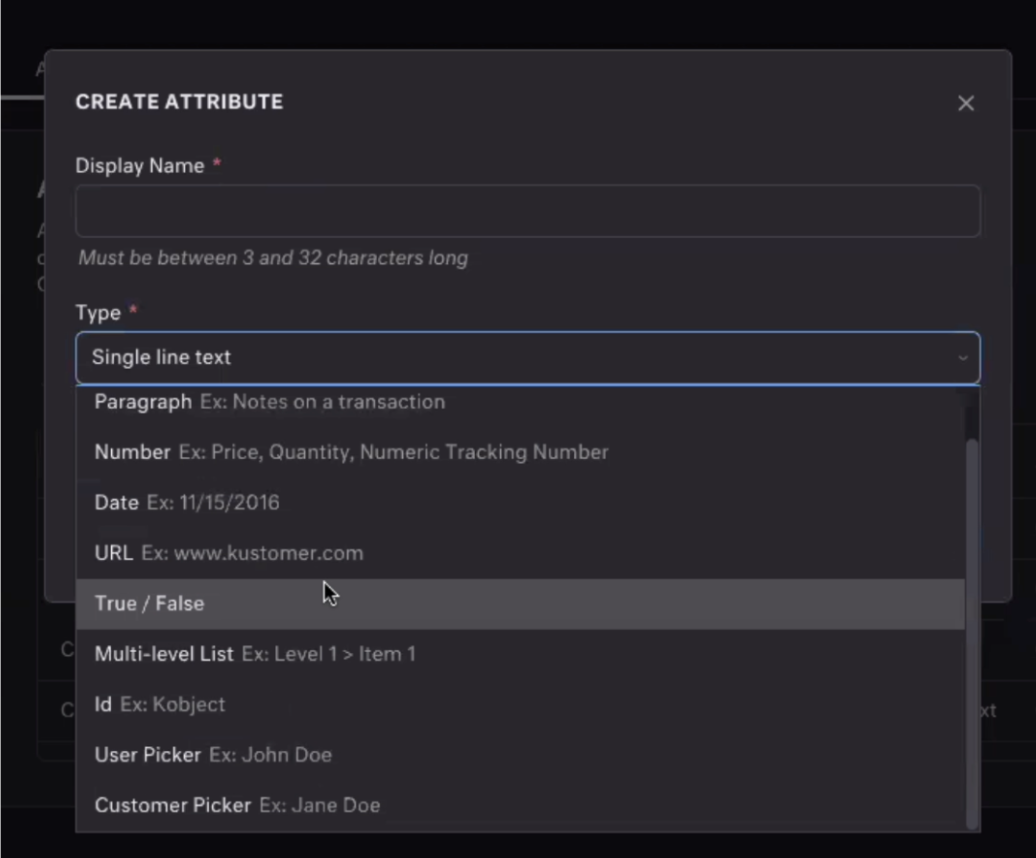
Create Attribute
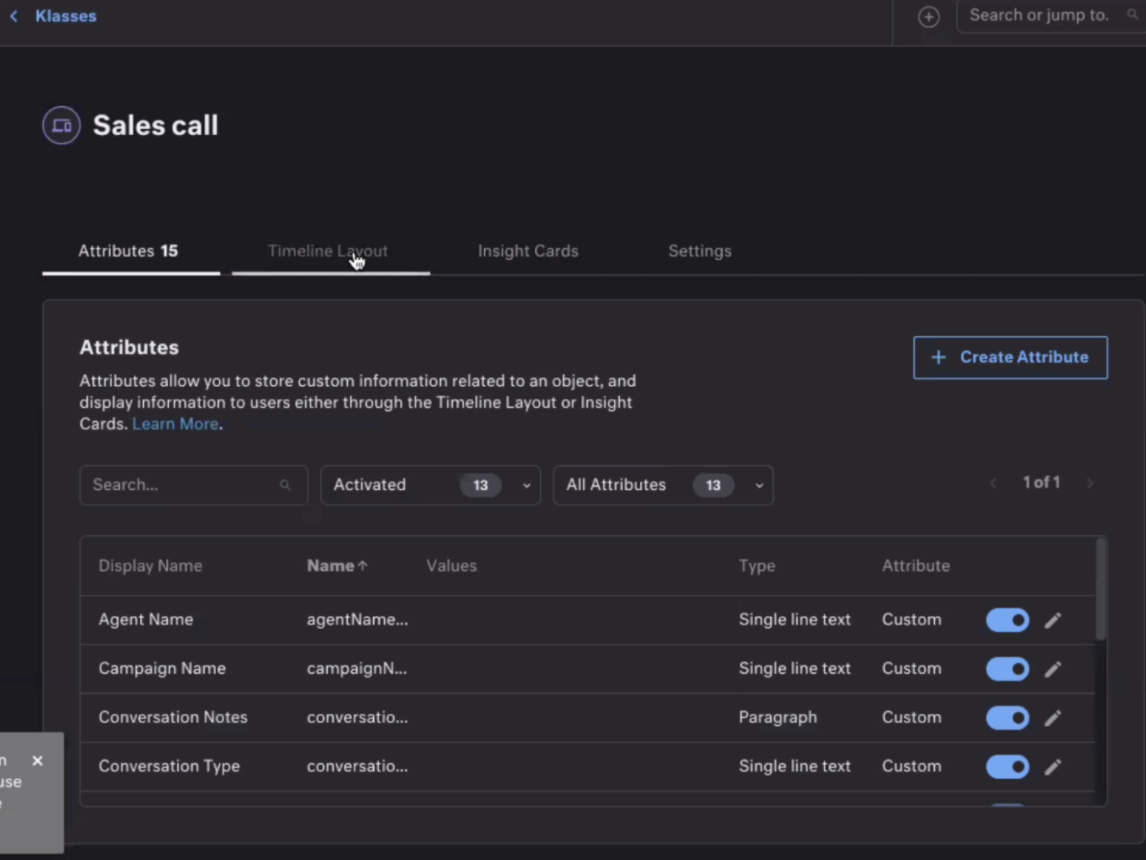
Attributes
Step 5: Change Klass settings
You can customize your Klass by selecting an icon and icon color to better represent the object. To change settings:
- Select the edit icon for the Klass.
- Select the Settings tab.
- Select an icon and color from the fields provided.
- Select Save Changes. You can see the changes in your Klass list.

Custom Klasses
Set up a workflow
Step 7: Create a new workflow in Kustomer - we recommend creating a different workflow for each event type.
- Go to Settings> Platform > Workflows
- Select Add Workflow, then create a new workflow from scratch or import via JSON.
Step 8: Add a hook to a new workflow.
- In the Workflow editor, select the Choose Trigger step. For the Trigger App, select Hooks.
- All of the existing hooks you've created will be displayed in the Trigger Event drop-down. Select the hook you created, then fill in a descriptive name and description.
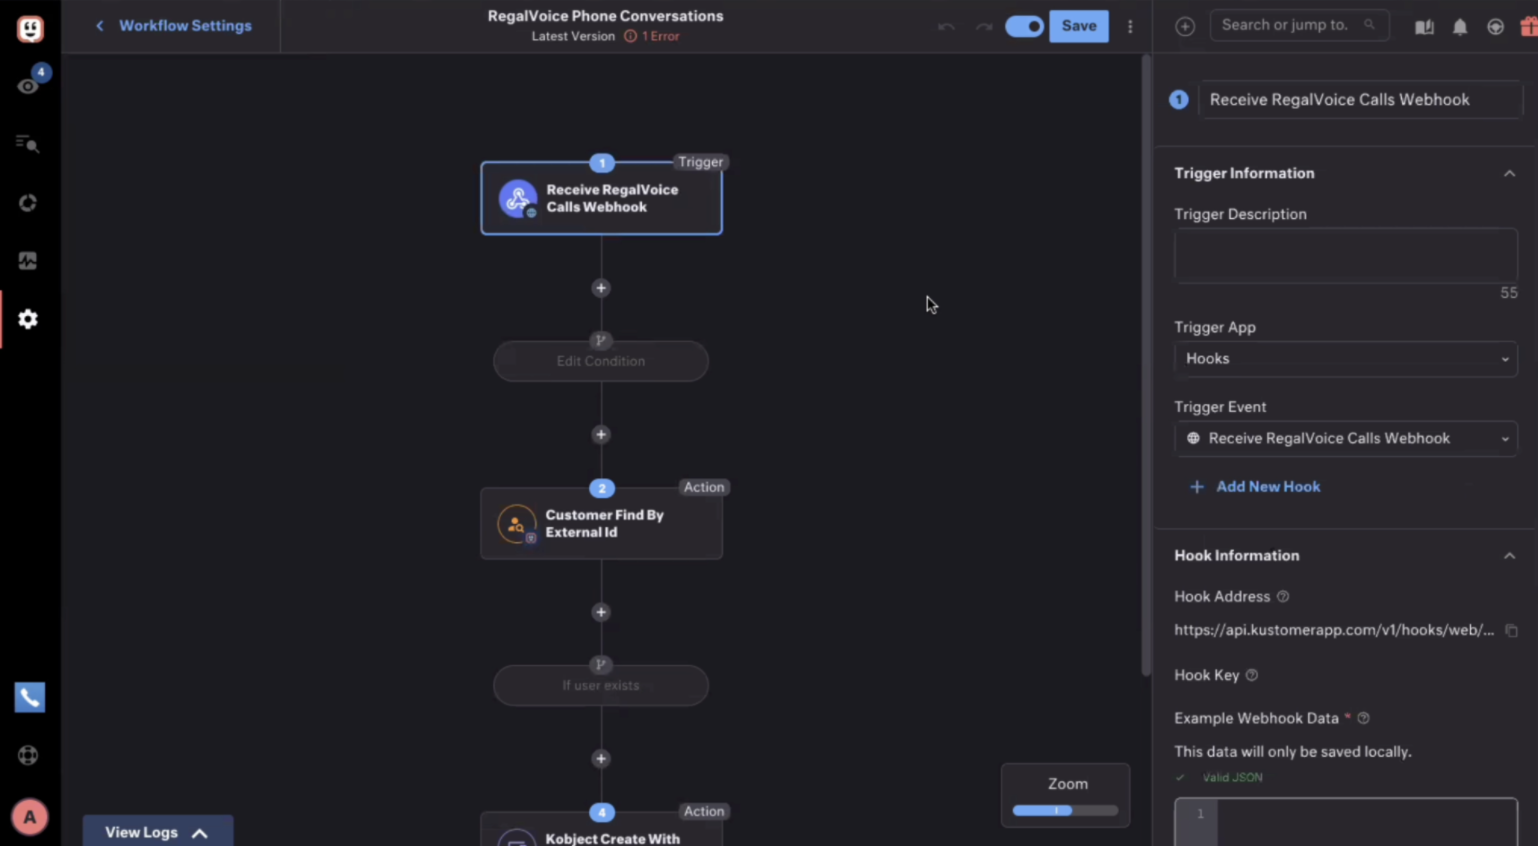
Trigger
Step 9: Add a Condition step to check the event name. In this example we're checking that it's a call.completed event
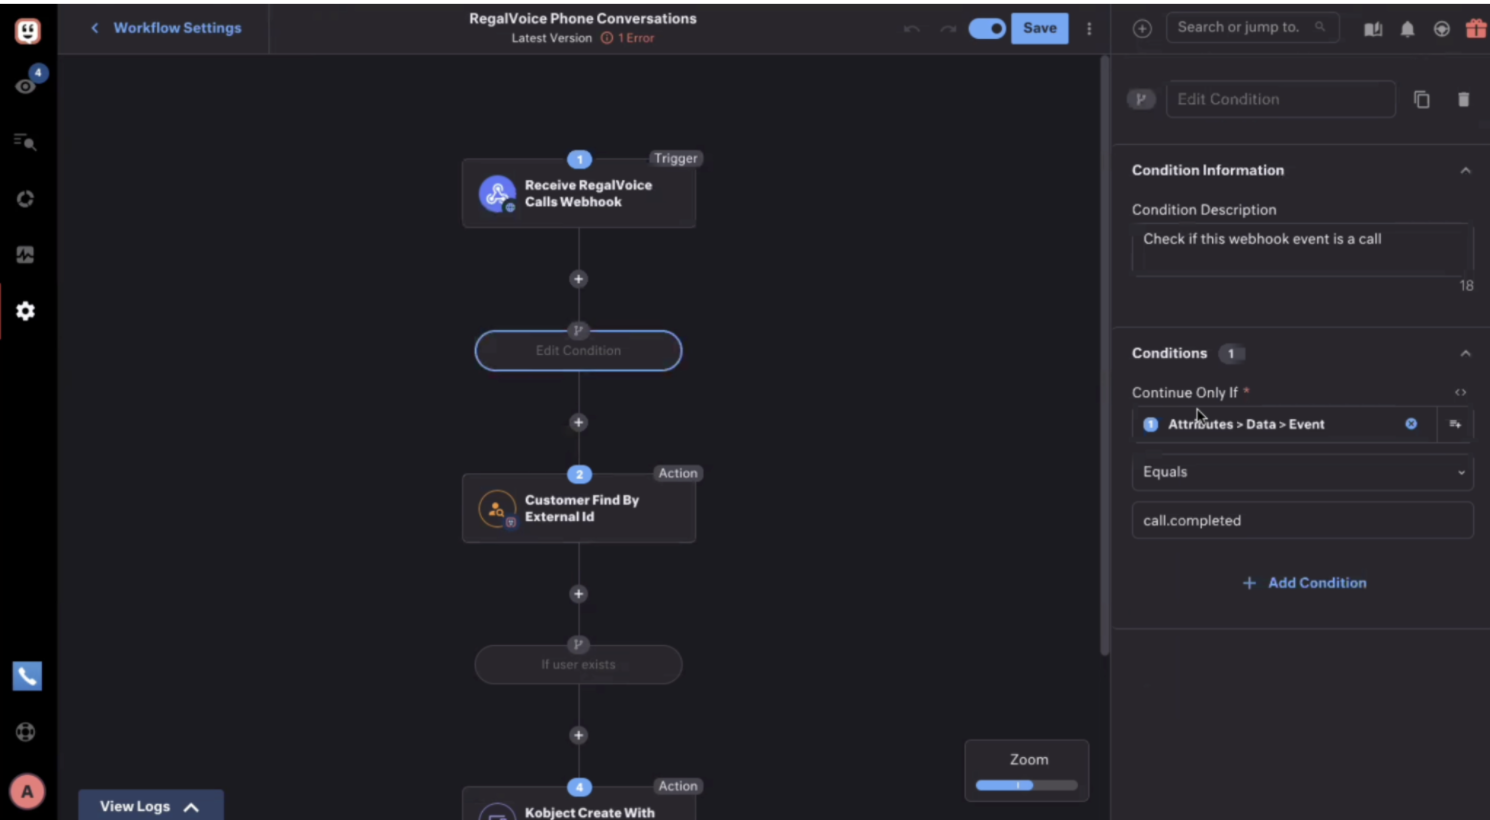
Step 10: It’s next necessary to identify the customer we will link the KObject to based on externalId, phone number, or email.
Selecting an ID to lookup customers
We recommend using externalId if you originally provided externalId when sending customer data to Regal. If not, we recommend using phone number.
Assuming you use externalId,
- Create a new step and select the “Customer Find By (External Id)” action.
- Populate the externalId field with with /#steps.1.attributes.data.externalId. This can can also be selected from the dropdown when clicking into the text field.
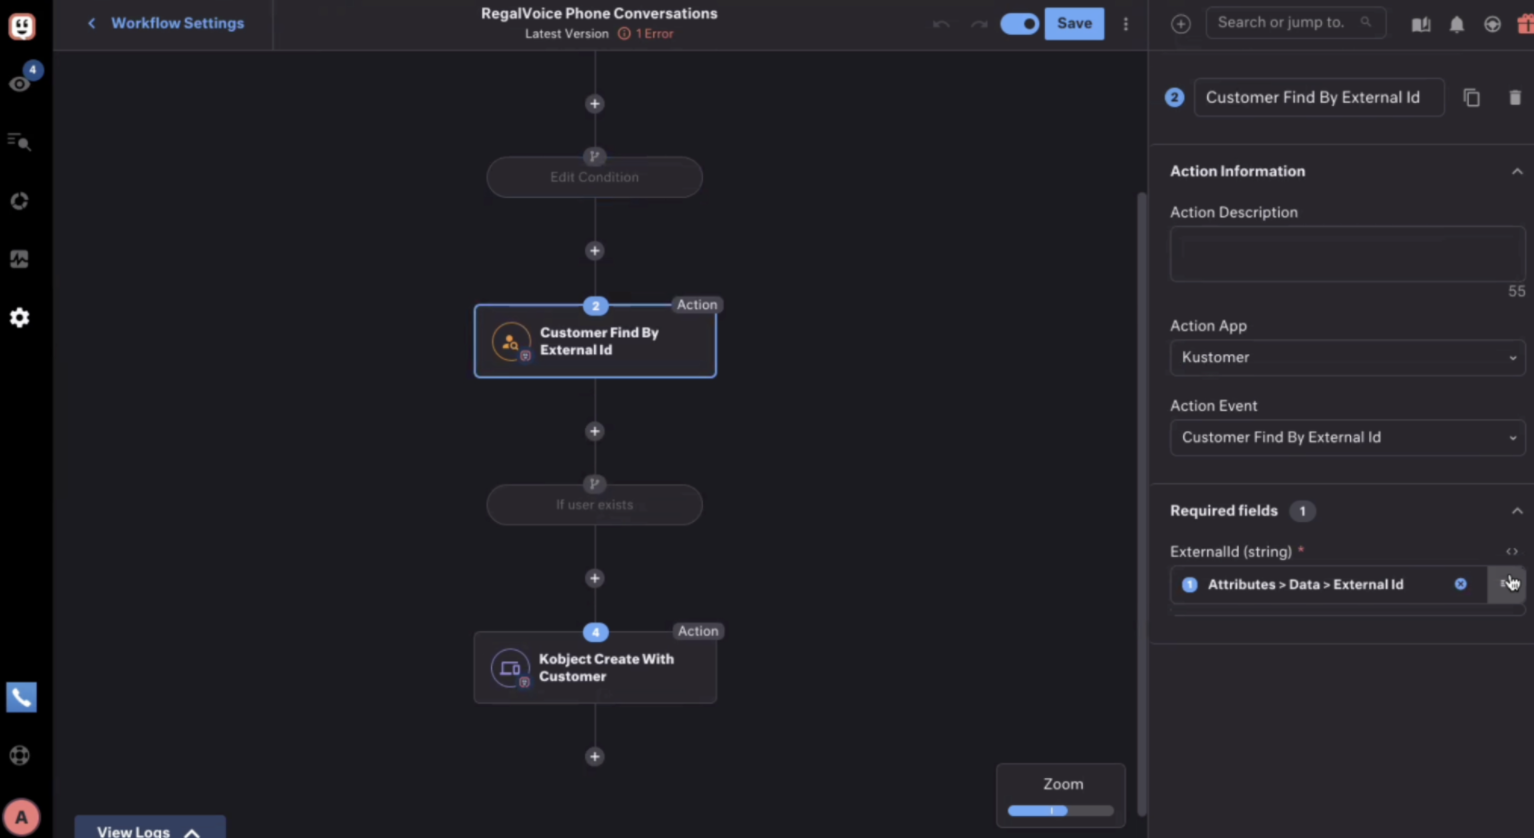
Step 11: Decide what to do if matching customer exists or does not exist.
- It’s possible that this customer does not yet exist within the Kustomer system, so after looking up the customer, check if any results were returned. To do so, click the plus icon and add a “Condition Step” to check if the previous step’s ID exists.
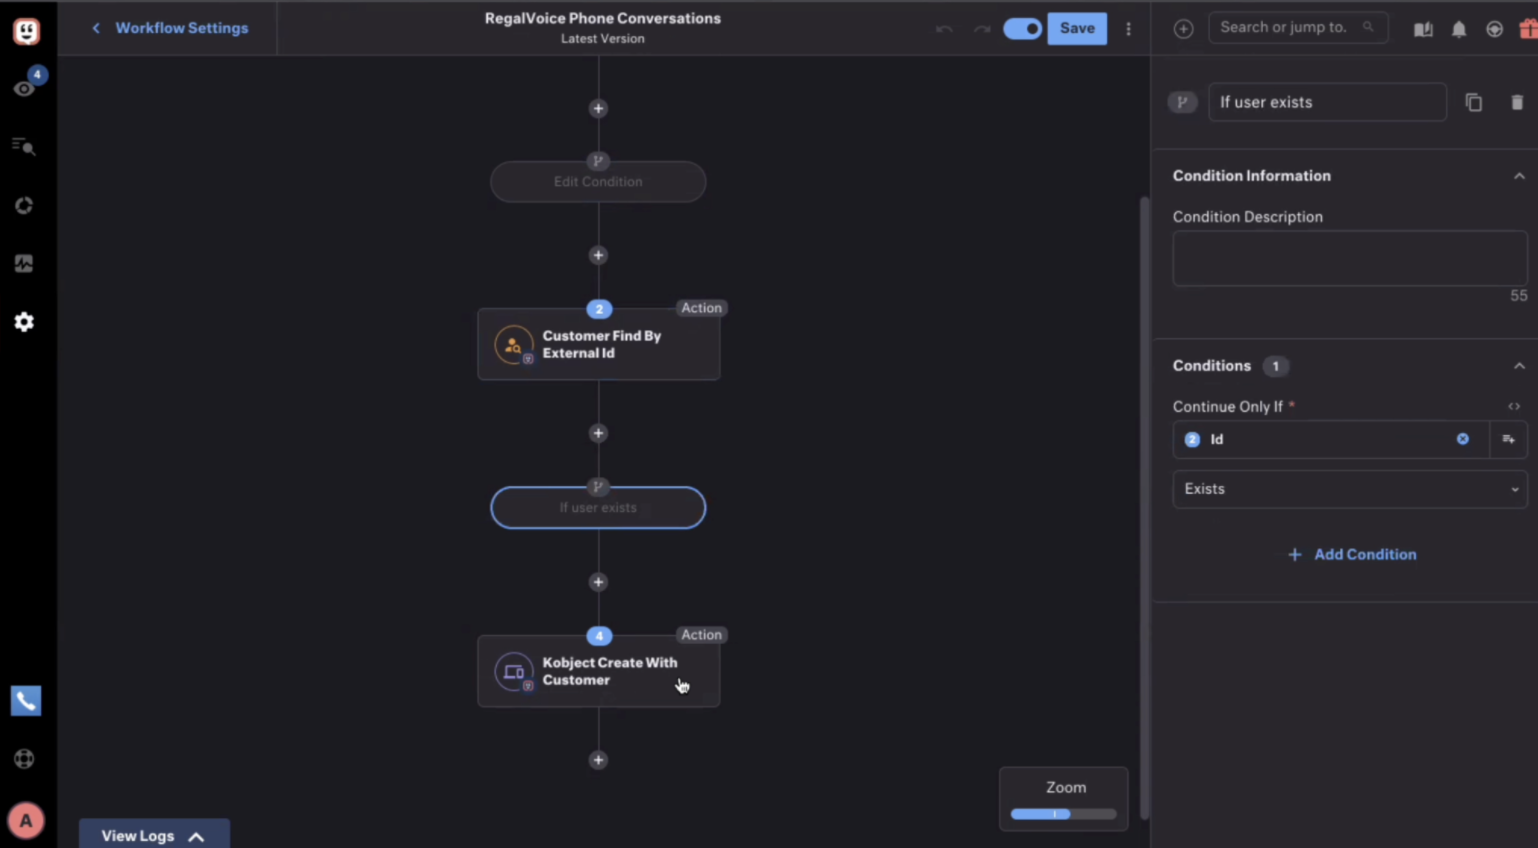
If user exists condition
Create a new customer record in Kustomer
This is not shown in the images, but if you want to create a new customer record in Kustomer if no matching customer is found, click the same plus icon and add a “Condition Branch” to check the opposite condition: that the previous step’s ID does not exist. Under the second branch, create a new step and select “Customer: Create”, the only relevant field is the externalId field, which we populate with /#steps.1.attributes.data.externalId from our trigger data. If the Workflow reaches this branch, it will create a customer if the record did not previously exist within Kustomer.
Step 11: End by adding a step with the “Custom Object (KObject): Create With Customer” action. There are several required fields for a KObject:
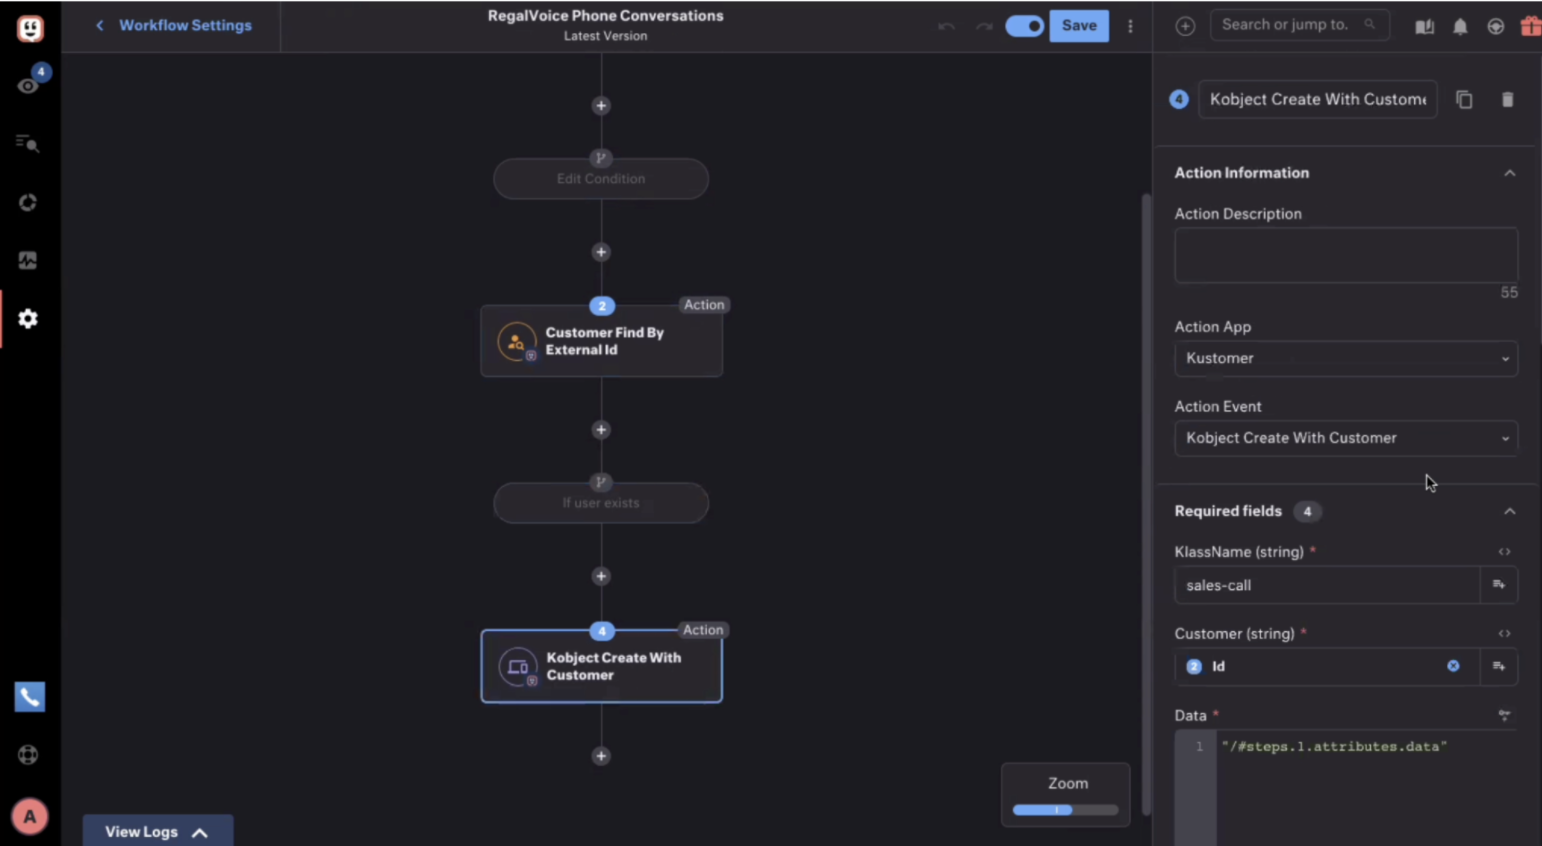
Define kObject
- KlassName: the name of the Klass for the object you want to create
- Customer: the ID of the customer either found or created, you should select the ID from the dropdown of the step preceding the one you created.
- Title: the display name of the object in the timeline
- Data: /#steps.1.attributes.data
- Custom: this where you need to map data from the Webhook log json to the Klass attributes you defined so that Kustomer knows which properties in the events map to the attributes you created.
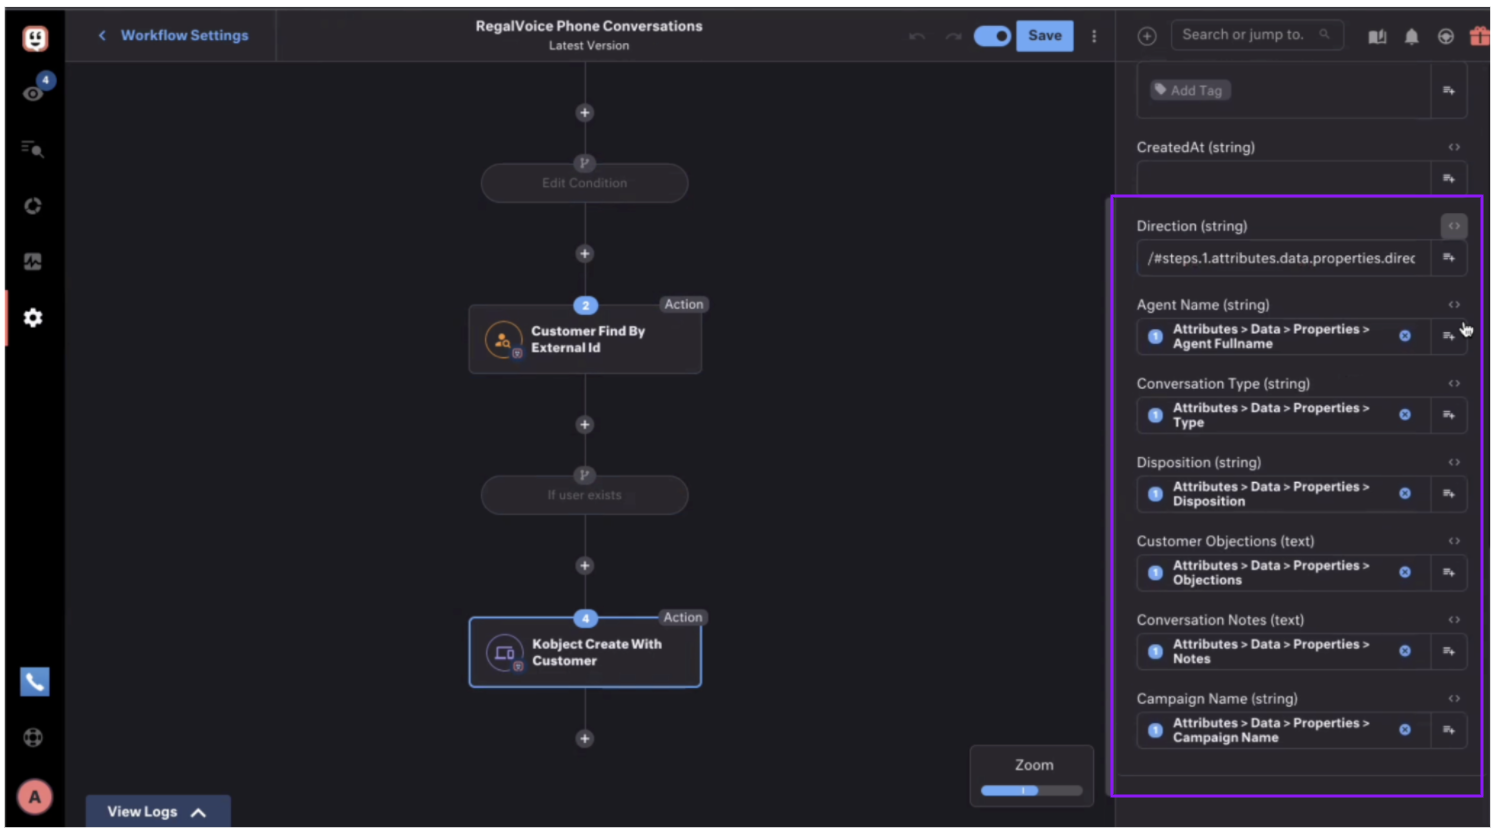
Mapping attributes
Step 12: Save and test your Workflow. This is an example of how Regal call events could display on a customer's timeline
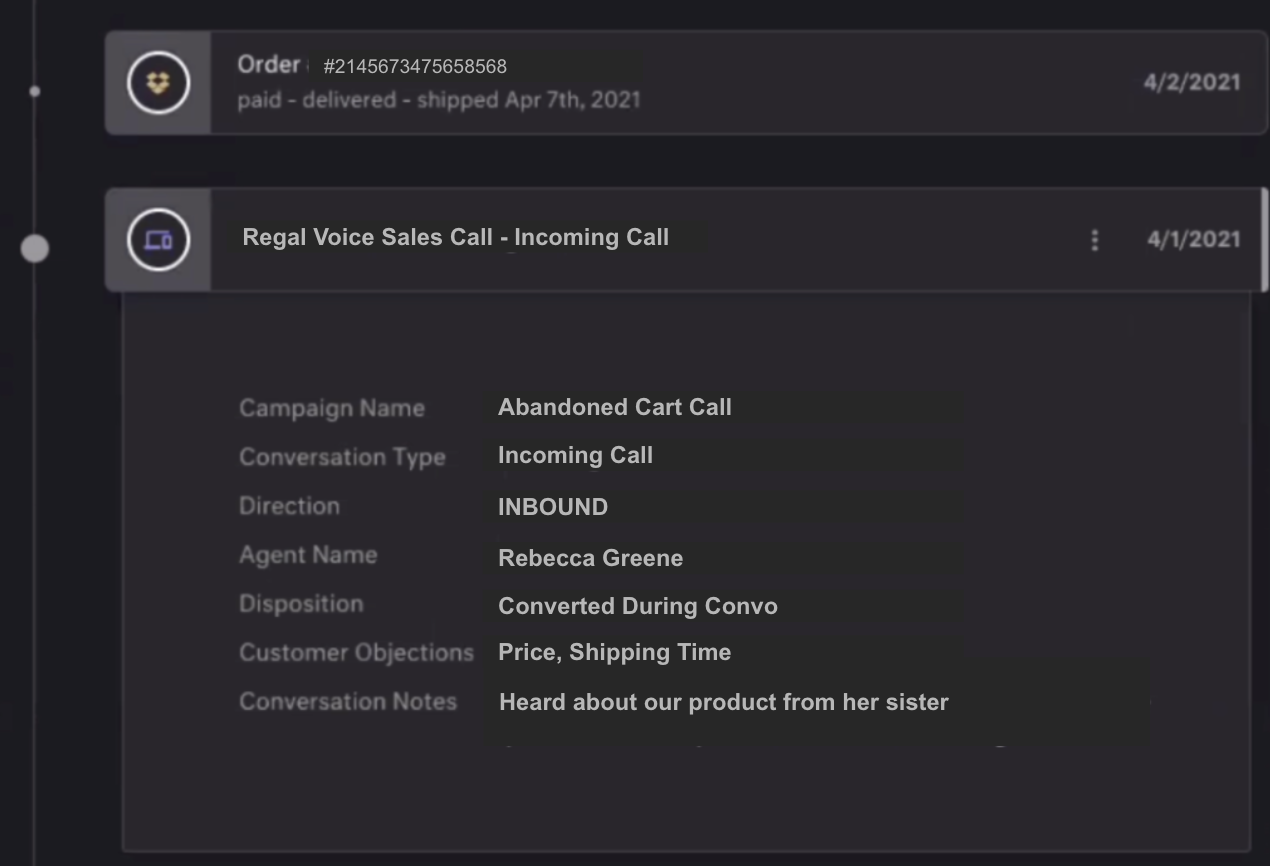
Regal Card in Customer Timeline
Regal Events Available in Kustomer
Regal publishes the following events to Kustomer:
| Event | Definition |
|---|---|
| sms.sent | An sms was sent from Regal to contact |
| sms.received | An sms was received from a contact |
| sms.conversation.completed | An SMS conversation between a contact and an agent was completed in the Regal agent desktop |
| call.completed | An inbound or outbound call with a contact was completed. This includes calls that were not answered |
| contact.created | A contact is created in Regal |
Event Schema of Regal Events
Here is the event schema for each of the events:
sms.sent
This event is sent for both automated campaign messages and messages sent from an agent.
- Automated messages have null agent information and a null sms_conversation_id, but include campaign information
- Agent messages include agent information, but have null campaign information
{
"event": "sms.sent",
"externalId": "12345",
"originalTimestamp": "1680298444",
"traits":
     {
     "email": "[email protected]",
     "phone": "+19545552399"
 },
"properties": {
     "direction": "outbound",
     "content": "Thanks for subscribing",
     "media_url": null,
     "regal_voice_phone": "+12445552556",
     "contact_phone": "+19545552399",
     "from_number": "+12445552556",
     "to_number": "+19545552399",
     "sms_conversation_id": null,
     "agent_fullname": "Rebecca Greene",
     "agent_id": "[email protected]",
     "campaign_friendly_id": 15,
     "campaign_id": "dg212-1245-1fgy-2561-gh25",
     "campaign_name": "Subscribe"
}
sms.received
This event is sent for when a message is received from a contact.
{
"event": "sms.received",
"externalId": "12345",
"originalTimestamp": "1680298444",
"traits": {
  "email": "[email protected]",
  "phone": "+19545552399"
},
"properties": {
    "agent_fullname": "Reebecca Greene",
    "agent_id": "[email protected]",
    "sms_conversation_id": "WXXXXXXXXX",
    "direction": "inbound",
    "content": "Thanks - this was really helpful. Can't wait to join!",
    "regal_voice_phone":"+12445552556",
    "contact_phone": "+19545552399",
    "from_number": "+19545552399",
    "to_number": "+12445552556"
}
sms.conversation.completed
This event is sent after an agent dispositions an outbound or inbound SMS task.
{
"event": "sms.conversation.completed",
"externalId": "12345",
"originalTimestamp": "1680298444" ,
"traits": {
  "email": "[email protected]",
  "phone": "+19545552399"
},
"properties": {
    "agent_fullname": "Rebecca Greene",
    "agent_id": "[email protected]",
    "sms_conversation_id": "WTXXXXXXXXXXXXXXXX",
    "campaign_friendly_id": "3",
    "campaign_name": "Welcome SMS",
    "completed_at": 1636644608,
    "contact_phone": "+19545552399",
    "direction": "INBOUND",
    "disposition": "Converted During Convo",
    "ended_at": 1636644604,
    "handle_time": 252,
    "notes": "Customer will call us back when she's ready",
    "tags": ["Discount Applied", "Happy"],
    "regal_voice_phone": "+12058834856",
    "started_at": 1636644589,
    "talk_time": 252,
    "type": "Inbound SMS",
    "wrapup_time": null,
    "content": [
      {"contact", "Thanks - this was really helpful. Can't wait to join!"},
      {"agent", "No problem! Anytime"}
    ]
}
call.completed
This event is sent after an agent dispositions an outbound or inbound call task.
{
"event": "call.completed",
"externalId": "12345",
"originalTimestamp": "1680298444",
"traits": {
  "email": "[email protected]",
  "phone": "+19545552399"
},
"properties": {
    "agent_fullname": "Regal Voice Circle Bank",
    "agent_id": "[email protected]",
    "call_id": "WTXXXXXXXXXXXXXXXX",
    "campaign_friendly_id": "63",
    "campaign_name": "Phone Lead - Call 1",
    "completed_at": 1636644608,
    "contact_phone": "+19545552399",
    "direction": "OUTBOUND",
    "disposition": "Converted During Convo",
    "ended_at": 1636644604,
    "handle_time": 19,
    "notes": "Customer will call us back when she's ready",
    "tags": ["Discount Applied", "Happy"],
    "regal_voice_phone": "+12058834856",
    "started_at": 1636644589,
    "talk_time": 15,
    "type": "Scheduled Callback",
    "wrapup_time": 4
}
contact.created
This event is sent after a contact is created in Regal. Source of the contact can be from an integration or an agent interaction for a contact that doesn't exist in Regal yet, such as incoming/outbound call/text.
{
"event": "contact.created",
"externalId": "12345",
"originalTimestamp": "1680298444",
"traits": {
  "email": "[email protected]",
  "phone": "+19545552399"
},
"properties": {
    "firstName": "Rebecca",
    "lastName": "Greene",
    "customProperity1": "Custom Value 1",
    "customProperity2": "Custom Value 2"
}
Updated over 1 year ago
